Cheesy Cauliflower Toasts
Yield: 6 to 8 servingsINGREDIENTS:
Step 1: Heat the oven to 400 degrees. Cut the cauliflower into ½-inch clusters. Transfer to a sheet pan and toss with the oil, red-pepper flakes, 1 teaspoon salt and ½ teaspoon pepper. Spread florets out into a single layer and roast, stirring every 10 minutes, until tender and browned in spots, 25 to 30 minutes. Step 2: Meanwhile, stir ricotta or mascarpone in a large bowl until smooth and fluffy. Mix in Gruyère, nutmeg, 1 teaspoon salt and ½ teaspoon pepper and set aside. In a toaster, toast the bread until golden. Step 3: When cauliflower is done, remove from the sheet pan and set aside to cool. Line the pan with foil and reduce the oven to 375 degrees. Step 4: Arrange the toasts on the lined sheet pan. Stir the cauliflower into the ricotta mixture, then divide among the toasts, spreading to the edges. Dust with Parmesan and paprika. (Recipe can be made up to this point and held at room temperature for up to 2 hours.) Step 5 Bake until toast edges and topping are browned, 10 to 15 minutes. (If desired, broil 2 to 3 minutes to brown and melt the top.) Let cool slightly. Sprinkle with herbs, if using, then cut into halves or quarters and serve immediately.
0 Comments
![]() Roasting vegetables to go with a main dish is a super easy way to add a healthy side to any dinner, or to add to some pasta. I love to roast a whole bag of the multi colored carrots, or some onions and butternut squash, or even just throw a bunch of vegetables from the fridge together for a medley. But broccoli is the easiest, and the most frequent one we make. Well, those and Brussels sprouts. You can always add some more flavor to these with some whole garlic cloves, or a little grated parmesan, or with a little spice like an Elote mix. It's fun to mix it up. Enjoy! Roasted Broccoli
INGREDIENTS: 1 - 1 1/2 lbs of broccoli crowns/florets, trimmed into 1 inch pieces 1/4 Cup Olive Oil Salt and pepper to taste 2-3 cloves of garlic , minced Optional: juice of 1/2 lemon for serving PREPARATION: 1. Preheat the oven to 425 degrees. 2. Line a baking sheet with parchment paper. 3. Place the trimmed broccoli on the parchment paper, drizzle with the olive oil and sprinkle with salt and pepper. Use your hand to mix and make sure the broccoli is all well-coated. 4. Bake in a single layer for 15 minutes. It should be lightly browned when it is done. 5. Add garlic, mix, and roast for 2 more minutes. 6. Remove from oven and drizzle with the lemon juice, and serve.
Savory Cottage Cheese High-Protein Breakfast Muffins
INGREDIENTS: 1 lb. Turkey breakfast sausage (preferable, no tin the casing. Remove casing if needed.) 4 Eggs ¼ Milk 1 cup 2% Cottage cheese 1 Tbsp Olive oil 1 Tbsp Maple syrup 1 ½ cups All purpose flour 2 tsp Baking powder 1/2 tsp Salt 1/2 tsp cracked black pepper 3 cups Chopped veggies (broccoli, spinach, red peppers, chives or yellow onion, mushrooms) 3 Green onions, chopped 1 cup Cheddar cheese (or Monterey Jack) PREPARATION: 1. Preheat oven to 400 2. Cook sausage in a medium skillet over medium high heat until browned and no longer pink in the middle, and then set aside to cool. 3. In a large mixing bowl, whisk together eggs, milk, cottage cheese, olive oil and maple syrup. 4. To that same bowl, then add the flour, baking powder and salt. Mix well. Add your cooked sausages, chopped vegetables, and cheese. Leave out a little cheese to sprinkle on top. 5. Divide evenly between 12 muffin pan (about 4 heaping Tbspoons or ¼ cup per muffin), and top with the additional cheese. 6. Bake for 23-27 minutes. Make sure the a toothpick comes out clean. ![]() I am always trying to make sure my family is eating healthy. And while the pre-packaged bags of 90 second rice make busy weeknights easier, I worry about the preservatives and plastics involved, especially as the plastic bag gets heated in the microwave. So when I saw this on instagram, I thought I'd give it a try. And it works so well that I'll never go back to the microwave bags. And you know what the bonus is? Making your rice this way is even better for you! Freezing cooked rice lowers its glycemic index (GI). Studies have shown it can reduce its GI by up to 10 points, This happens because of a process called retrogradation, where some of the starch in the rice converts to a more resistant form than is digested more slowly. Easier and healthier all around! Tip: A the beginning of each month, I'll make a rice cooker full of rice just for freezing. I let the rice cool for about 15 minutes before I make my frozen rice packages. To freeze the rice: 1. I use the rice paddle to place a baseball size amount of rice (about 1 cup) onto a piece of plastic wrap. 2. Form the rice into a round shape. 3. Wrap tightly. 4. Repeat with the remaining rice. (My rice cooker is on the small size and makes enought for 6 rice balls at a time.) 5. Freeze for 12 hours or until firm. It will keep for 1 month. To reheat the frozen rice: 1. Remove the plastic wrap. 2. Place frozen rice in a microwave safe bowl. Cover with a wet paper towel. 3. Microwave on high for 1 1/2 to 2 minutes until thoroughly heated.
Easy Breakfast Egg Bites
INGREDIENTS 8 large eggs ⅓ cup whole milk ½ teaspoon salt ½ teaspoon ground pepper 1 cup shredded Monterey Jack cheese 1 cup packed fresh (not frozen) spinach, chopped ⅔ cup chopped roasted red peppers Optional: ½ tsp tabasco or other hot sauce (Other possible flavor combinations/options: I love spinach and peppers but they can be replaced by, or mixed with, sauteed kale, sauteed asparagus, and/or bacon.) PREPARATION Step 1: Preheat oven to 350°F. Coat a 12-cup muffin tin with cooking spray. Step 2: Whisk eggs, milk, salt and pepper together in a large bowl until well combined and frothy. Fold in cheese, spinach and roasted red peppers until combined. Step 3: Divide the mixture among the prepared muffin cups (about 1/3 cup each). Step 4: Bake until puffed, set and lightly golden, and starting to pull away from the sides of the pan – between 16 to 18 minutes. Let cool in the pan for 5 minutes before serving. Storage: Once the Egg Bites have fully cooled, you can store them in an airtight container in the freeze for up to 2 days. To Freeze: Once the Egg Bites have fully cooled, you can store them in an airtight container in the freeze for up to 3 months. Defrost them in the refrigerator overnight, and warm them up in the microwave in the morning. ![]() 
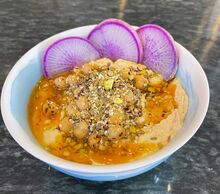
I love hummus as a snack, a dip, or even on a veggie sandwich. And especially as a way to enjoy all of the fabulous vegetables from my farmer's market. But I've gotten tired of the store bought versions and finally tried my own. And WOW! I may never do anything but buy a can of chick peas to make my own hummus in the future. It was so easy, and so satisfying. I hope you'll give it a try, too! Homemade Hummus INGREDIENTS:
Spices for Topping:
For Dipping:
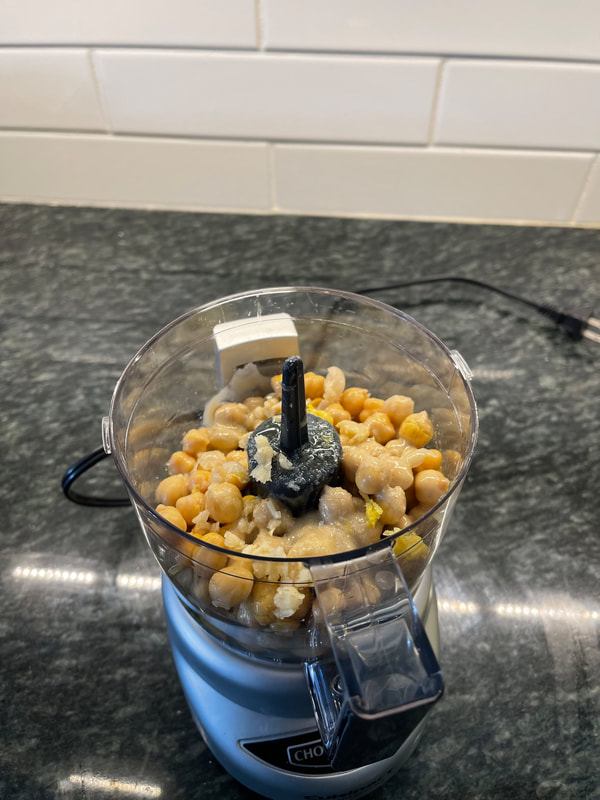
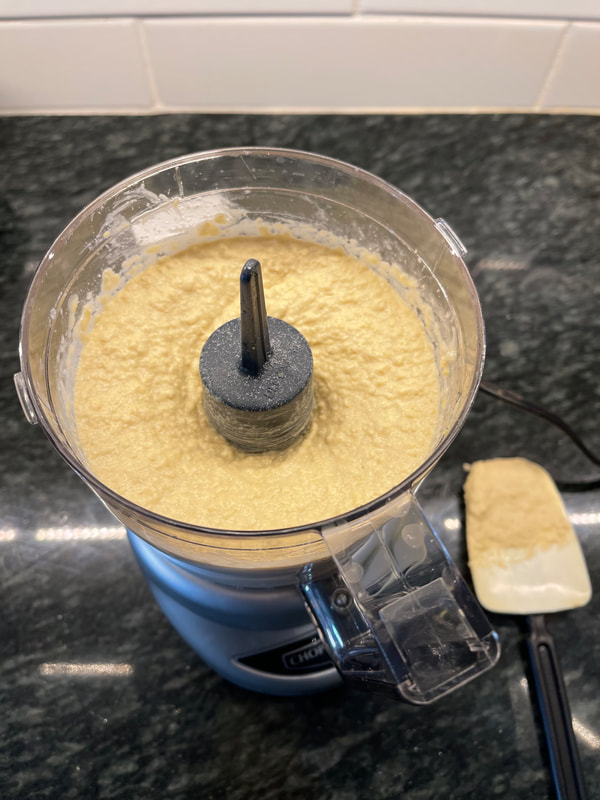
Directions: 1. Zest and juice lemon 2. Cut radishes and cucumbers into slices 3. Slice carrots into sticks To make the hummus: 4. Rinse and drain the chickpeas, reserving 2 Tablespoons of the chickpeas for the topping 5. In small food processor, combine the chickpeas, 1/2 teaspoon of the garlic, tahini, lemon zest, lemon juice, 2 Tablespoons of olive oil, and some salt. Pulse to combine, scraping the sides of the bowl and adding water 4-6 Tablespoons of water as needed to make it smooth. To make the Topping: 6. In a small bowl mix the remaining garlic with 1/2 of the spices for topping. 7. In a small saute pan, heat 1/4 cup olive oil over medium and add the reserved 2 Tablespoons of chickpeas. Cook for 3-4 minutes (they may pop - so be aware). 8. In a small bowl, pour the contents of the pan and the oil over the remaining spices. Plating: 9. Dish the hummus into a bowl, or spread onto a shallow plate. Arrange the vegetable and naan around it. 10. Spoon the spice mixture over the hummus. Cheese Stuffed Dates are so simple, and so yummy!
This recipe is an amalgamation of a few different recipes over the years. I get the medjool dates, with seeds, and then two different soft cheeses like a goat cheese, a mascarpone, or a bleu. And when I am done, I like to sprinkle them with olive oil and some sea salt or Himalayan pink salt. PREPARATION: 1. Preheat the oven to 375F 2. Slice the dates lengthwise and remove the seed. 3. Spoon a bit of the cheese into the date. 4. Place the dates on a baking sheet, lined with parchment, with the cut side up. Warm in the oven for 8-10 minutes. 5. Place on a serving plate and drizzle with olive oil and sprinkle with salt. Voila! ![]() 
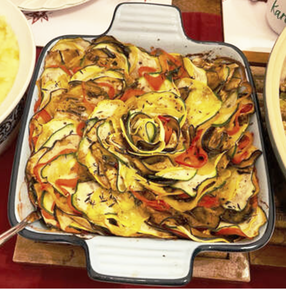
It's late summer/early fall and you have a a TON of zucchini and squashes. What to do? The answer is to make a yummy Ratatouille! Yes it takes some time to clean and slice everything just so, but it is a lot easier if you use a mandoline. And it is so worth it. I found this recipe on allrecipes.com: Disney’s Ratatouille INGREDIENTS:
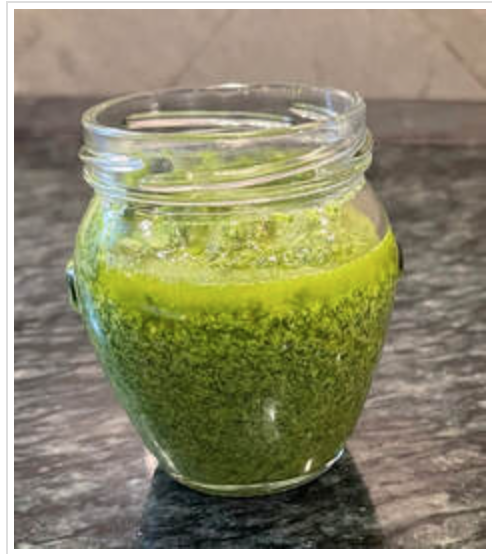
PREPARATION: 1. Preheat oven to 375F. 2. Spread tomato paste in the bottom of a 10 x 10 baking pan (note: I used an 8x8 pan and it worked just fine). 3. Sprinkle with onion and garlic, and stir in one T of olive oil and water until thoroughly combined. Add salt and pepper to taste. 4. Arrange alternating slices of eggplant, zucchini, yellow squash, red bell pepper and yellow bell pepper, working from the outer edge of the dish and working concentrically towards the center. Overlap the pieces slightly to display the colors. 5. Drizzle the vegetables with the 3T of olive oil and season with salt and pepper. Sprinkle with the thyme leaves. Cover vegetables with a piece of parchment paper cut to fit inside the dish. 6. Bake in the preheated oven for 45 minutes, until the vegetables are roasted and tender. Serve with dollops of mascarpone cheese. What to do with an abundance of Basil in your summer herb garden (and seriously it’s like Little Shop of Horrors – it’s a huge basil plant!). Well, homemade pesto of course!
|
AuthorKris Delaney is a marketing executive, foodie, travel enthusiast, and book nerd based in Atlanta, GA. Archives
March 2025
Categories |