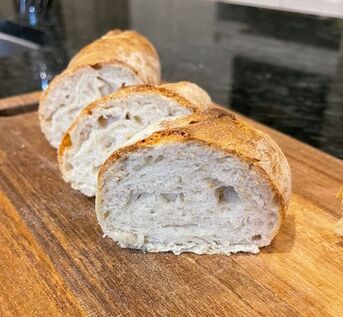
 Fall is a great time for Chili, slow cooker stews, or just a nice charcuterie plate. All of which are yummy with some fresh French Bread. I have had good luck with the Classic Baguette recipe from King Arthur Baking, so I tried it again. I make the poolish the night before (around 5 or 6pm – before I get started on dinner) with the plan to cook it in time for an early dinner the next day. To do that, you need to get started at 7am the next day. There are a lot of little steps to this one, so this is NOT ideal for a Saturday morning with a lot of activities. But if you know the next morning’s games are a washout, then game ON! The only change I make to this recipe is for Step 12. I place the cast iron pan on the bottom rack of the oven while the oven heats in the bottom of the oven. And once I placed the bread in the oven, then I added 2 cups of ice cubes to the cast iron pan and shut the door quickly. This recipe is a keeper, as long as you plan ahead of time for it and make your poolish. Enjoy! Classic Baguette recipe from King Arthur Baking INGREDIENTS:Starter (poolish):
Dough:
PREPARATION:
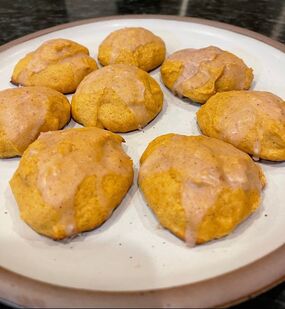 I have always been a fan of Giada, and I really love her new holistic cookbook, Eat Better, Feel Better. So when I found this variation of her famous Lemon Ricotta Cookies I had to give them a try in the Delaney test kitchen. I am typically the only pumpkin spice fan in my family because the flavor can be overwhelming, but these say Fall without being too much. I even got a thumbs up on this recipe from my anti-PSL husband. These were super easy and are like little muffin tops. And at only 116 calories each, they are the perfect Fall cookie. Pumpkin Ricotta Cookies INGREDIENTS: For The Cookies: · 2 ½ cups all-purpose flour · 1 teaspoon baking powder · 1 teaspoon ground cinnamon · 1/4 teaspoon ground ginger · 1 teaspoon salt · ½ cup (1 stick) unsalted butter, at room temperature · 1 cup granulated sugar · 1 cup brown sugar · 2 eggs · 1 cup whole-milk ricotta cheese · 1/2 cup pureed pumpkin, such as Libby’s For the Glaze: · 1 ½ cups powdered sugar (confectioners’ sugar) · 3 tablespoons water · ¼ teaspoon cinnamon · 1/4 teaspoon freshly grated nutmeg · Pinch of salt PREPARATION: · Preheat the oven to 375°F. Prepare 2 baking sheets with parchment paper. · In a medium bowl, combine the flour, baking powder, cinnamon, ginger and salt. Set aside. · In a large bowl, using an electric mixer, beat the butter, granulated sugar and brown sugar until light and fluffy, about 3 minutes. Add the eggs, 1 at a time, beating until incorporated, using a rubber spatula to scrape the sides if needed. Add the ricotta cheese and pumpkin, and beat to combine. Stir in the dry ingredients until just incorporated, being careful to not over-mix. · Spoon the dough onto the baking sheets using 2 tablespoons for each cookie. Bake for 13-15 minutes until slightly golden at the edges. Remove from the oven and let the cookies rest on the baking sheet for 20 minutes. · While the cookies cool, combine the powdered sugar, water, cinnamon, nutmeg and a pinch of salt in a small bowl and stir until smooth. Spoon about ½ teaspoon of the glaze onto each cooled cookie and use the back of the spoon to spread it to the edges. Let the glaze harden for about 2 hours. Pack the cookies in an airtight container. 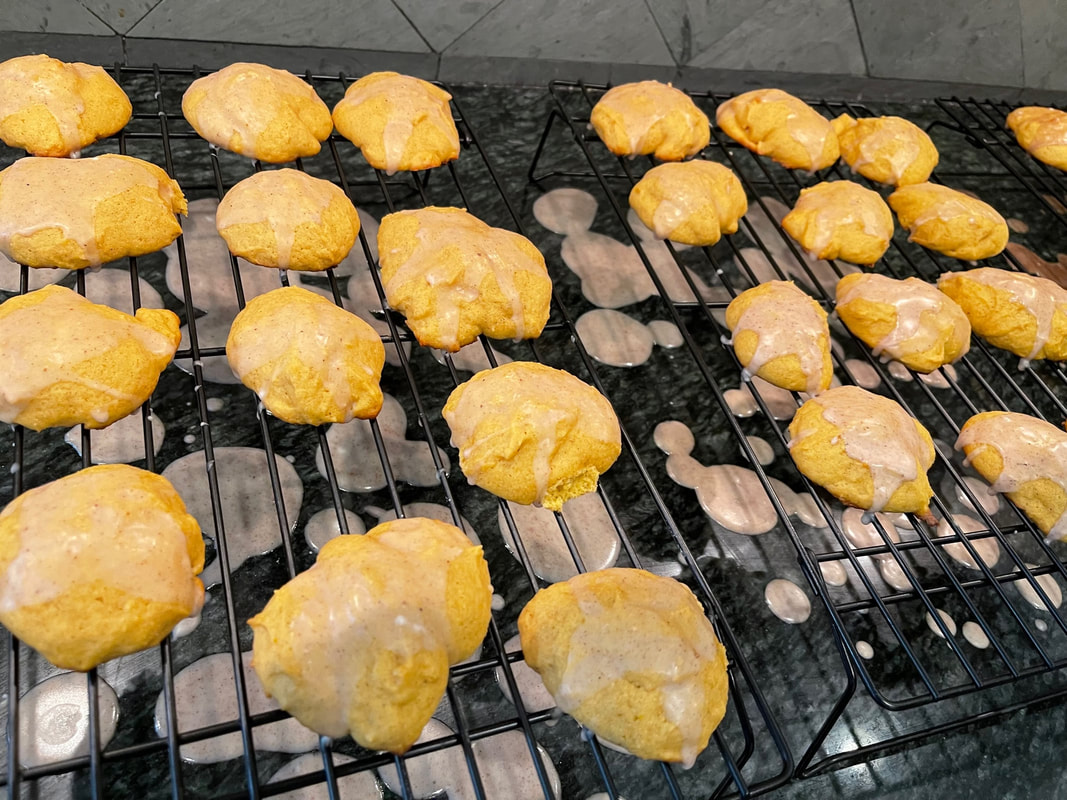 Pumpkin Ricotta Cookies just after being glazed. 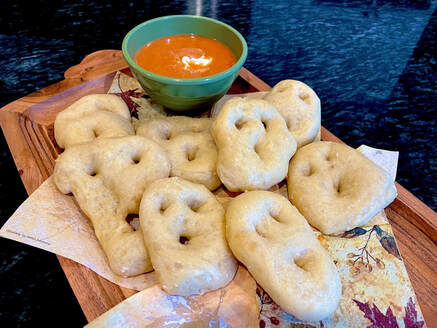 I saw this adorable recipe in my Insta feed from Simply So Good and had to give it a try in the Delaney test kitchen. Plus - I love learning new French words.
A Fougasse is a type of bread typically associated with Provence but found in other variations in other regions as well. Some versions are sculpted to resemble an ear of wheat. These ghosts are "souper" cute for Halloween, and for dipping into soups or with pasta. I’m listing the recipe as posted on simplysogood.com, but I’d like to make a few recommendations: The recipe says to break the dough into 8-12 pieces for the “ghosts.” Maybe I let the dough sit in the fridge for tool long overnight, but I had a lot of dough. So I would say that it could make closer to 20 ghosts. Mine were just too big and as a result were too puffy and took too long to bake. They would have started to burn on the bottom before they were going to turn golden on top. Also, the recipe doesn’t list a temperature for the oven. Depending on how hot your oven runs, I think 350 – 400F works great. No-knead Ghost Fougasse INGREDIENTS: · 3 1/2 cups all-purpose flour · 2 teaspoons salt · 1 teaspoons yeast · 1 teaspoon sugar · 1 1/2 cups warm water · 2 tablespoons olive oil · 2 tablespoons butter melted · Flakey sea salt optional PREPARATION: Part I: the Fougasse Dough 1. In a large mixing bowl combine flour, salt, yeast, and sugar. Stir to combine. 2. Add water and olive oil. Stir just until all the flour has been mixed in and no dry spots appear. The mixture will look kind of shaggy, but not too lumpy. 3. Cover with plastic wrap and let sit at room temperature for 2-3 hours or until the dough has risen to double the size. Do not punch the dough down. Place in refrigerator overnight or at least 4 hours. Part II: Shaping the Fougasse 1. Remove dough from the refrigerator and pour it onto a floured surface. 2. Divide the dough into 8-12 pieces depending on how large you'd like to fougasse. Let the dough rest for 10 minutes to make it easier to shape. Pull and shape the dough into an oval or round shapes. 3. Using a pizza wheel or sharp knife make slits in the dough. Pull and stretch the dough to create fun ghost shapes and faces. Place on parchment-lined baking sheets. Cover and let rise for 10-20 minutes. Bake in preheated oven for 12 minutes or until golden. 4. Remove from oven and brush with melted butter and flakey sea salt. Recipe Notes · Fougasse dough can be left to rise overnight and used without chilling. · Chilling the dough makes shaping the fougasse easier. |
AuthorKris Delaney is a marketing executive, foodie, travel enthusiast, and book nerd based in Atlanta, GA. Archives
May 2023
Categories
All
|
 RSS Feed