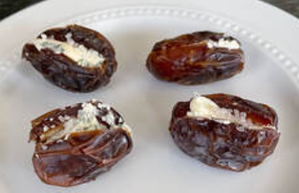
The Dish with Kris
  • Home
  • Breads
  • Quick WFH Lunches
  • Busy Mom Dinners
  • Some Favorite Recipes
  • Beverages
  • Beige Food for My Boys
  • Other "Dishes" (art, fashion, etc...)
  • BOOKS
  • Travel
  • About Me
  • Contact

SOME FAVORITE RECIPES

Christmas Menus for 2021

12/26/2021

 
Picture
After the presents, and before making the feast, you have to make Breakfast for a crowd:

Cooking breakfast on Christmas morning is always a challenge. Not everyone likes those breakfast casseroles, and the last things I want to do it to make anything complicated when I am going to be cooking all day. My friend Shane recently taught me a great breakfast hack: to cook soft boiled eggs in a muffin pan. To augment the eggs, I added Sourdough English Muffins (which I made the evening before), bacon and sausage (both easily cooked while the eggs were cooking), skillet hashbrowns, and melons and berries on the side.


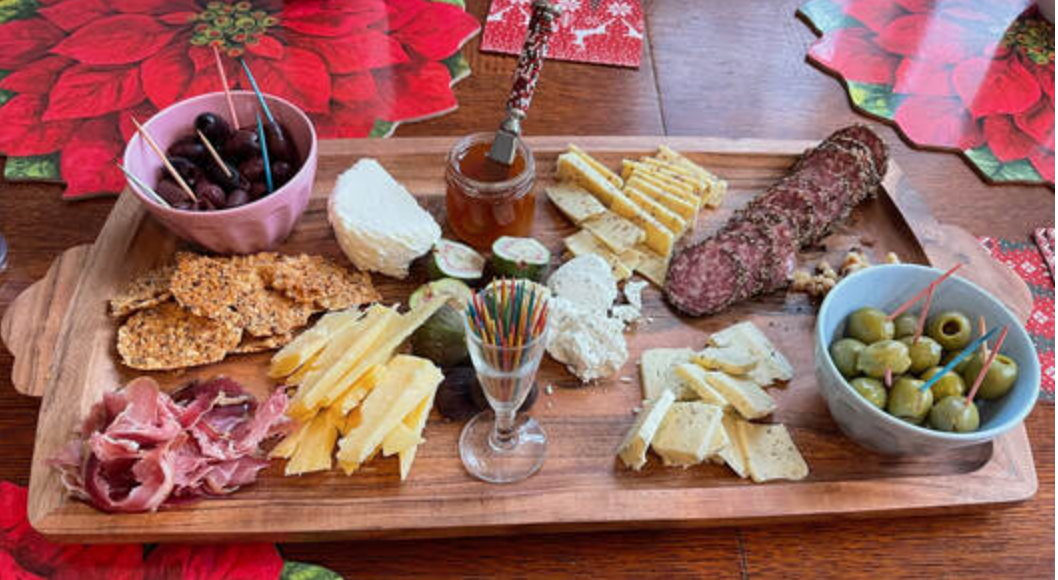
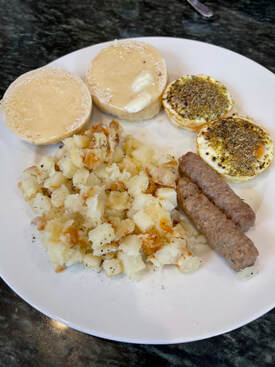
Soft Boiled Eggs for a Crowd:
 
1.  Preheat oven to 350F
2.  Butter each cup of a 12-cup muffin pan.
3. Crack an egg into each cup.
4. Add a tablespoon of water to each cup, and then sprinkle the top of each egg with a pinch of salt and pepper, and a sprinkle of Italian seasoning.
5. Cook for 10-15 minutes (the longer they cook, the more hard-boiled they become). 
​6. Use a teaspoon or offset spatula to gently pry each egg from the pan, and serve.
 
In the afternoon, everyone is arriving and you are getting the kitchen going and staged for the dinner.  To keep everyone happy, I try to keep the Afternoon Snacks and Appetizers super simple with a Charcuterie Plate, some Cheese Stuffed Dates, and a old family recipe from Sweden for potato dumplings with bacon and onions called KruppKakker (
Kruppkakker is a traditional Swedish dish, that in my family we save special for Christmas because a) it’s a lot of work and b) it’s not the healthiest. It's peasant food, and it's delicious. So it gets its own separate post later.)

Charcuterie Plate – This is always a crowd pleaser, and I will select the cheeses based on the what I know my guests like, along with some nice deli meats, local honey and some seasonal fruit like figs. And definitely some olives – my favorite.

Picture
Picture
Cheese Stuffed Dates (so simple, and so yummy!)
This recipe is an amalgamation of a few different recipes over the years.
I get the medjool dates, with seeds, and then two different soft cheeses like a goat cheese, a mascarpone, or a bleu.  And when I am done, I like to sprinkle them with olive oil and some sea salt or Himalayan pink salt.


PREPARATION:
1.   Preheat the oven to 375F
2.  Slice the dates lengthwise and remove the seed.
3.  Spoon a bit of the cheese into the date.
4.  Place the dates on a baking sheet, lined with parchment, with the cut side up.  Warm in the oven for 8-10 minutes.
5.  Place on a serving plate and drizzle with olive oil and sprinkle with salt.


And of course while everyone is noshing, you are cooking.  In order to make a dinner that is not just Thanksgiving 2.0, I always try hard to really mix up the sides from a traditional Holiday  This year, the Dinner Menu was:
Main course:  Turkey roasted on the Big Green Egg
Sides: Asparagus with Bacon, Slow Cooker Mac ‘n Cheese, Beet Salad with Feta and Walnuts, Ratatouille, Mashed Potatoes, Stuffing
 
Cooking the turkey on the Big Green Egg not only creates a perfectly cooked turkey, but it frees up the ovens for all of the side dishes.  We brined it overnight, and then injected it with Applewood flavor , and put a basic rub on the outside, and when we put it on the Egg, we placed an aluminum tray underneath it with sliced apples, onions and chicken broth.

Picture
To create even more flexibility in the kitchen, I cook Mac n Cheese in the Slow Cooker.  This is a recipe I’ve used for years, and while I continue to test new slow cooker mac ‘n cheese recipes, this one is always a crowd favorite.  Plus, you can set it and forget it and let it cook while working on everything else. I started making this when all the older kids were little, but everyone always eats it - not just the kids.  

Slow Cooker Mac ‘n Cheese
 
INGREDIENTS:
  • 16oz macaroni
  • 1 12oz can of milk
  • 1 ½ cups regular milk
  • 1 tsp salt
  • 4 cups shredded extra sharp cheddar cheese
  • ¼ cup melted margarine
  • 2 eggs, beaten
  • Pepper to taste
 
PREPARATION:
  • Cook and drain macaroni. Set aside
  • Mix the next 7 ingredients together.
  • Place the cooked macaroni in a greased slow cooker (a 3 Qt or 4Qt size is perfect)
  • Add the cheese mixture and stir to blend well
  • Cook for 3-4 hours on the low setting.
 
Picture
Two new additions to my holiday menu this year are also time-savers, but are full of flavor. These are the asparagus wrapped in bacon, and the Roasted beet Salad with goat cheese and walnuts.

Bacon Wrapped Asparagus:
 
INGREDIENTS:
  • 1 pound (approximately 2 bunches) of asparagus
1 T extra virgin olive oil
½ teaspoon black pepper
½ tsp Salt
8 strips of thick cut bacon, or one per guest
 
PREPARATION:
1.  Preheat oven to 400F. Line a large baking sheet with parchment paper.

2.  Place asparagus on a plate and drizzle with the olive oil and sprinkle with the salt and pepper and toss to coat evenly.

3.  Count the spears and divide into the same number of groups as you have guests, or at least 8 groups.

4.  Hold a bundle, and starting midway to the top, wrap the bundle with one piece of bacon. Overlap it lightly at the top to secure it in place. Then place the bundle on the lined baking sheet, seam-side down. Repeat with each remaining bundle of spears.

5.  Bake for 25-30 minutes, until the bacon is crisp and the asparagus is tender. Serve warm.

Roasted Beets with Feta and Walnuts
 

They key to making this a time saver for you is to buy the pre-cooked beets in the produce section.  To make this recipe I used 2 boxes of the pre-cooked beets.
 
INGREDIENTS:
  • 2 packages of pre-cooked beets
  • 4 ounces crumbled feta cheese
  • ½ Tablespoon of extra virgin olive oil
  • 2 Tablespoons balsamic vinegar
  • ½ cup of chopped walnuts
  • 2 T chopped chives
  • 8ounces of arugula
 
PREPARATION:
1.   Wash, dry and place the arugula into a large serving bowl.
2.  Slice the beets into quarters, or round slices as per your preference, and place them on top of the arugula.
3.  Crumble the feta on top of the beets, and sprinkle the whole bowl with the walnuts and chives.
4.  Drizzle the olive oil and balsamic vinegar in a zig-zag pattern across the top of the salad, and serve.
 
 
These next two items are relatively easy, so that frees up time for two more time intensive items:  Ratatouille and Mashed Potatoes. Both just take a lot of time cleaning, peeling, slicing, etc…  The ratatouille was made much easier by using my mandoline, which also made all of the slices perfectly even. I found this recipe on allrecipes.com:
 
Disney’s Ratatouille
INGREDIENTS:
    • 1, 6oz can of tomato paste
    • ½ onion, diced
    • ¼ cup minced garlic
    • 1 T olive oil, and 3 T olive oil (divided)
    • ¾ cup water
    • 1 small eggplant, trimmed and thinly sliced
    • 1 zucchini, trimmed and thinly sliced
    • 1 yellow squash, trimmed and thinly sliced
    • 1 red bell pepper, cored and thinly sliced
    • 1 yellow bell pepper, cored and thinly sliced
    • 1 tsp fresh thyme leaves
    • 3 T mascarpone cheese
    • Salt and pepper to taste
 
PREPARATION:
1.  Preheat oven to 375F.
​
2.  Spread tomato paste in the bottom of a 10 x 10 baking pan (note: I used an 8x8 pan and it worked just fine).

3.  Sprinkle with onion and garlic, and stir in one T of olive oil and water until thoroughly combined.  Add salt and pepper to taste.

4.  Arrange alternating slices of eggplant, zucchini, yellow squash, red bell pepper and yellow bell pepper, working from the outer edge of the dish and working concentrically towards the center. Overlap the pieces slightly to display the colors.

5.  Drizzle the vegetables with the 3T of olive oil and season with salt and pepper. Sprinkle with the thyme leaves. Cover vegetables with a piece of parchment paper cut to fit inside the dish.

6.  Bake in the preheated oven for 45 minutes, until the vegetables are roasted and tender. Serve with dollops of mascarpone cheese.
Picture
For mashed potatoes, I rely on the tried and true classic Basic Mashed potatoes recipe from allrecipes.com.
 
Basic Mashed Potatoes:
 
INGREDIENTS:
2 pounds baking potatoes (I prefer Yukon golds)
2 T butter
1 cup of milk
Salt and pepper to taste

 
PREPARATION:
1.  Bring a large pot of salted water to a boil. Add potatoes and cook until tender but still firm, about 15 minutes, and then drain. (note: I peel and pare my potatoes first. I don’t like skins in my mashed potatoes, and paring them helps them to cook more evenly).

2.  In a small saucepan, heat the butter and milk over low heat until the butter is melted. Using a potato masher or an electric beater, slowly blend the milk mixture into the potatoes until smooth and creamy. Season with salt and pepper to taste.

 
Tips:  
​1.  I get the water started before I start peeling the potatoes. By the time I’m done, the water is usually ready.
 
2.  After I drain the potatoes, I return them to the pot.  I add the milk/butter mixture in there and use the hand mixer in that same pot.  Them I put it in a different dish to serve it.  But this cuts down on making another unnecessary dirty bowl in a very busy kitchen.
 
Stuffing:
There are a lot of great stuffing recipes, but if you don’t have the time I strongly recommend the stuffing from the Honey Baked Ham company.  Get two of them. But if you do want to make it from scratch, here’s my favorite recipe for Basic Bread Stuffing from New York Times Cooking.
Picture

Signature Spice Rub

12/19/2021

 
Picture

This is my recipe for my signature spice rub.  \It makes about a cup at a time, and is great on chicken or pork. It can also be made in bulk and shared with dear friends at the holidays. As long as it is in an airtight container, it could last forever - but it won't! Enjoy!


​
Signature Spice Rub:
½ cup packed brown sugar
1T kosher salt
1T chili powder
1T sweet paprika
1 T onion powder

1T garlic powder
½ T smoked paprika
2 tsp ground black pepper
2 tsp dry mustard
1 ½ tsp ground cumin
1 tsp ground oregano
 
Combine all of the ingredients in a small mixing bowl.
​Great for pork or poultry. Any extra can be stored in an airtight container to keep it dry.

Picture

Basil Pesto

9/4/2021

 
Picture

What to do with an abundance of Basil in your summer herb garden (and seriously it’s like Little Shop of Horrors – it’s a huge basil plant!). Well, homemade pesto of course!
 
There are a ton of pesto recipes out there, so I decided to start with a very simple, basic one by Florence Fabricant with NYTCooking.  I also saved a pretty jar from some olive tapenade which made the perfect vessel for my beautiful pesto (see photo).
 
 
​

Basic Pesto
 
INGREDIENTS


  • 2 cups fresh basil leaves (no stems)
  • 2 Tablespoons pine nuts (or walnuts)
  • 2 large cloves of garlic
  • ½ cup extra virgin olive oil
  • ½ cup freshly grated parmesan cheese
 
PREPARATION
  1. Combine basil leaves, pine nuts, and garlic in a food processor and process until very finely minced.​​

Picture
2.  With the machine still running slowly dribble in the oil and process until the mixture is smooth.

3.  
Add the cheese and process very briefly, just long enough to combine.
​
4.  
Serve, or store in the refrigerator or freezer.
Picture
5. Or just mix it with some cooked pasta and some of your favorite pasta add-ons.  For me, that's summer peas, sautéed onions, and black olives.
Picture

Best Gazpacho Ever

8/14/2021

 
Picture


I loved it when it was summer when I was little and my mom made gazpacho.  I still equate the smell of it to a warm summer afternoon.  And this summer we have had an abundance of everything – tomatoes, jalapenos, cucumbers… So when I saw the IG post from NYT Cooking with their recipe for the Best Gazpacho, I knew I had to give it a try.  I have already made it three times before even sitting down to write this post. It is that good.  It’s like drinking a summer garden. 
 
The second time I made it, I ran out of my own tomatoes so I used heirloom tomatoes which I purchased with my groceries through Garnish & Gather, one of my favorite Atlanta-based businesses.
 
 Best Gazpacho Ever!

INGREDIENTS
  • About 2 pounds ripe red tomatoes, cored and roughly cut into chunks
  • 1 Italian frying (cubanelle) pepper or another long, light green pepper, such as Anaheim, cored, seeded and roughly cut into chunks (I used an Anaheim pepper and it was delicious)
  • 1 cucumber, about 8 inches long, peeled and roughly cut into chunks
  • 1 small mild onion (white or red), peeled and roughly cut into chunks
  • 1 clove garlic
  • 2 teaspoons sherry vinegar, more to taste
  • Salt
  • ½ cup extra-virgin olive oil, more to taste, plus more for drizzling
 
PREPARATION
1.     Combine tomatoes, pepper, cucumber, onion and garlic in a blender or, if using a hand blender, in a deep bowl. (If necessary, work in batches.) Blend at high speed until very smooth, at least 2 minutes, pausing occasionally to scrape down the sides with a rubber spatula.

2.     With the motor running, add the vinegar and 2 teaspoons salt. Slowly drizzle in the olive oil. The mixture will turn bright orange or dark pink and become smooth and emulsified, like a salad dressing. If it still seems watery, drizzle in more olive oil until texture is creamy.

3.     Strain the mixture through a strainer or a food mill, pushing all the liquid through with a spatula or the back of a ladle. Discard the solids. Transfer to a large pitcher (preferably glass) and chill until very cold, at least 6 hours or overnight.

4.     Before serving, adjust the seasonings with salt and vinegar. If soup is very thick, stir in a few tablespoons ice water. Serve in glasses, over ice if desired, or in a bowl. A few drops of olive oil on top are a nice touch.

Picture
Before....
Picture
.... and after!

Sweet Nectar Cake:

5/31/2021

 
Picture
I am old school in a lot of ways. For example, I still love magazines and I prefer the printed page over a digital page.  And one of the things I enjoy are cooking magazines. I’m sure that’s a shocker.  One of my favorites is allrecipes, and the April/May 2021 issue is filled with some great recipes - including the green gazpacho I plan to make next weekend.  But the prettiest one was for Sweet Nectar Cake, using Nordic Ware’s 10-cup Honeycomb Pull-Apart Pan.  The pictures were gorgeous – I knew I had to try it in the Delaney Test Kitchen.  And I am not a big chocolate person, or really a dessert person in the first place, so this was perfect for me – a lemony, fruity cake that is also gorgeous to look at. In fact the pictures in the issue included some gorgeous edible flowers, which is what inspired me to plant some of my own in my Aero Garden.
 
Sweet Nectar Cake recipe from allrecipes:
 
INGREDIENTS:
·       1 (18.25 ounce) package lemon cake mix
·       ⅓ cup honey or white sugar (I used honey from my favorite, The Savannah Bee Company)
·       ½ cup vegetable oil
·       1 cup peach or apricot nectar (I used peach. I am in Georgia, y’all.)
·       4 eggs
·       1 cup confectioners' sugar (optional)
·       2 tablespoons lemon juice (optional)
 
PREPARATION:
 
Step 1
Grease and flour a 10 inch tube pan. Preheat oven to 325 degrees F (165 degrees C).
Step 2
Combine cake mix with honey (or sugar), cooking oil, and peach (or apricot) nectar. Beat for two minutes with mixer. Add eggs one at a time, beating for 30 seconds after each addition. Pour batter into pan.
Step 3
Bake for 50 to 60 minutes. Cool for 10 minutes in the pan before turning out onto a plate.
Step 4
In a small bowl, mix lemon juice with confectioners' sugar until you reach desired consistency. Drizzle glaze over sides of warm cake.
 

The recipe calls for using a box of lemon cake mix. But if you have more time, I would suggest making it from scratch.  Here is the recipe suggested from Nordic Ware.  To make it fit more with the Sweet Nectar recipe above, I’d replace the sour cream with 1 cup of peach or apricot nectar.
 
Honey Lemon Pull Aparts, recipe from Nordic Ware
 

INGREDIENTS:
 
Cake:
·       3 cups cake flour
·       1 1/ 2 teaspoons baking powder
·       1 teaspoon baking soda
·       1/ 4 teaspoon salt
·       1 cup butter, softened
·       1 1/ 2 cups sugar
·       4 eggs
·       2 tablespoons finely grated lemon rind
·       1 cup sour cream
Glaze:
·       3 tablespoons honey
·       1/ 2 cup powdered sugar
·       2 tablespoons lemon juice
 
PREPARATION:
  1. Heat oven to 325° F (175°C)
  2. Grease and flour pan; set aside.
  3. In medium bowl, combine flour, baking powder, baking soda and salt; set aside.
  4. In large bowl, beat butter and sugar on low speed until blended. Beat on medium speed until light and fluffy.
  5. Add eggs and beat until well blended.  
  6. Add flour mixture, sour cream and lemon rind; blend on low speed 1 minute, scraping bowl often.
  7. Beat on medium speed 2 minutes.
  8. Spoon batter into prepared pan.
  9. Bake for 45-55 minutes, until toothpick inserted comes out clean. Cool 10 minutes in pan.
  10. Meanwhile, make glaze: In small saucepan, combine all glaze ingredients and heat over medium heat until sugar dissolves and glaze is warm. Invert cake onto cooling rack and brush with honey glaze.

Picture

TikTok Avocado Chips

5/14/2021

 
Picture
I always have a lot of avocados in the house because I love avocado toast. But sometimes they get a little mushy and I need to find something else to do with them.  Now I have a solution.   Another recipe making the rounds on TikTok is Avocado Chips. So I gave it a turn in the Delaney Test Kitchen for you. Plus, my Google Analytics tell me that the TikTok recipes are the most viewed pages of my site, so I thought I'd try another one for you.
 
The recipe for this is super easy:
 
Ingredients:
1. One over ripe avocado
2. One egg
3. One cup of grated parmesan
4. Everything but the Bagel topping, or jut Salt & Pepper

Instructions:
1. Mash the avocado in a bowl, add a beaten egg and the cheese. Mix  well.
 
2. Drop in circles on a parchment lined cookie sheet, mash them flat and top with Everything but the Bagel. Should make 11-12 rounds.
 
3. Bake for 30 minutes at 350 F.
Voila!
 
These were, not surprisingly, very yummy.  The next time I make them I may add a pinch of salt to the mash before baking – I think it needs a little something. Maybe it needs a bit of lemon juice, not unlike guacamole. I might also try it with mixing in a little shredded mozzarella cheese.
 
One Tik Tok suggestion is to double or triple the recipe, and to make larger chips as a substitute for bread. I may try that next time but that sounds like a lot of food.  But if you're doing a Keto diet, that might be awesome.
 
If you try this one, let me know how it goes!
 

Avocado Toast

2/2/2021

 
Picture
​Avocado toast has become my new favorite breakfast. Or lunch. It’s healthy, delicious, simple to make, and simple to dress up. This is a nutritious meal in under 5 minutes.

There is basic avocado toast. And then there all the ways you can personalize it. Much like tacos, the options are endless.  I like to use various ingredients like microgreens, cherry tomatoes, bacon, jalapenos, chives, radishes, spinach, arugula, red pepper flakes, onions, salmon, goat cheese and dill in a variety of combinations. But you can really just use anything you have on hand.

Step 1:  Toast your bread.  You can use any type of bread, and I prefer thick cut white bread.  But crusty bread or whole grain can make it even healthier.

Step 2: Cut, scoop and mash the avocado in a small bowl. A fork works great for this.

Step 3: Add to the mash. For this, the basic mash, I suggest using a squirt of lime, salt and pepper, and maybe some cilantro. Mix it up well.

Step 4: Spread the mash on the toast. Give it another pinch of sea salt and Voila!

Step 5 is Optional: some people like to add egg to the top of the toast – sunny-side up, poached, or even hard boiled. This definitely helps to give you a bigger dose of protein to get through the morning.

Additional Flavor Option Ideas:
cheese and chives, salmon and dill, salmon and dill and goat cheese, pico de gallo, bacon and tomato, or bacon and tomato and lettuce.

Picture

​Selecting your Avocados:

The key to great avocado toast is bring able to pick a great avocado.
 
It is hard to find them already ripe in the store, anyway. So I get them on the harder side and place them in a bowl on the countertop to ripen.  You can tell when they are ready when they are slightly soft to the touch, and the nub where the stem was attached easily flips off with a fingertip.

​
Picture

    Author

    Kris Delaney is a marketing executive, foodie, travel enthusiast, and book nerd based in Atlanta, GA.

    Archives

    September 2021
    August 2021
    May 2021
    February 2021

    Categories

    All
    Beverages
    Breakfast Recipe
    Pasta
    Snacks

    RSS Feed

Proudly powered by Weebly
  • Home
  • Breads
  • Quick WFH Lunches
  • Busy Mom Dinners
  • Some Favorite Recipes
  • Beverages
  • Beige Food for My Boys
  • Other "Dishes" (art, fashion, etc...)
  • BOOKS
  • Travel
  • About Me
  • Contact