THE DISH WITH KRIS
  • Home
  • Busy Mom Dinners
  • Easy Lunches
  • Travel Itineraries
  • Travel Blog
  • FULLY BOOKED!
  • Breads & Baking
  • Veggies & Bevvies
  • Beige Food for My Boys
  • Links
  • Other "Dishes" (art, fashion, etc...)
  • About Me

Busy MOM DINNERS

Pasta Primavera with Asparagus and Peas

5/9/2021

 
Picture
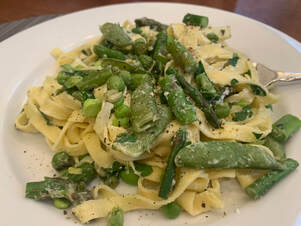
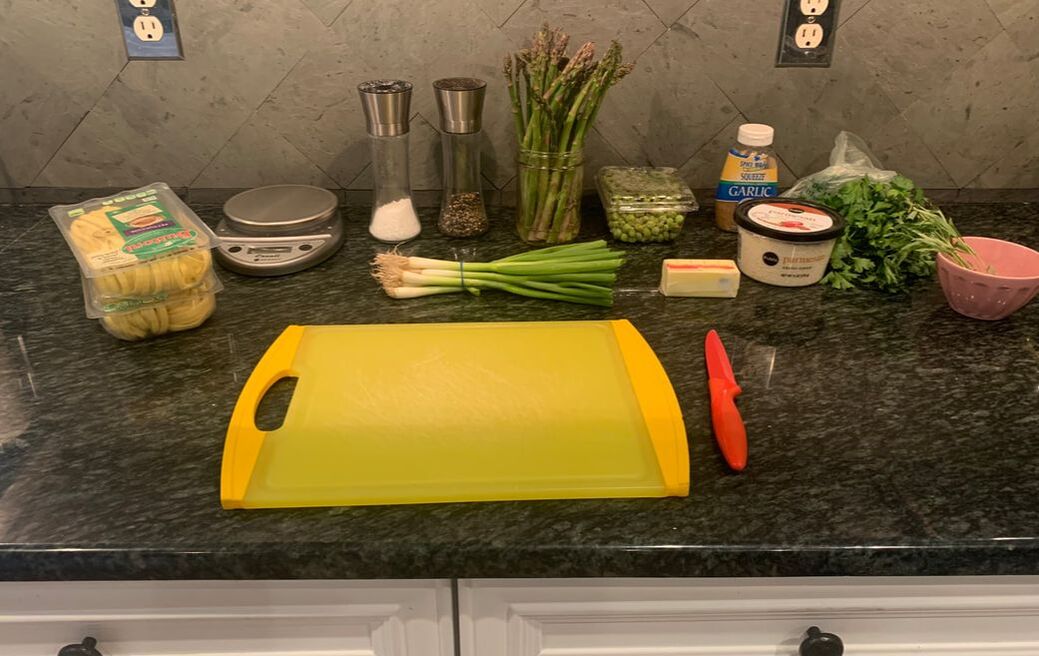
I love asparagus, but I am so tired of just steaming it.  I was looking for another option when I found this recipe for Pasta Primavera with Asparagus and Peas from the New York Times Cooking.  So I decided to give it a try in the Delaney Test Kitchen.
 
You’ll see that the recipe calls for crème fraiche or whole milk Greek yogurt.  I went the yogurt route to be a little more healthy, but I could see how the crème fraiche would have added more flavor.

I also felt that there wasn't enough sauce, so I used 1/4 cup of the pasta water when I mixed it all together and that worked great.
 
I also used Buitoni Fettuce from the supermarket instead of making my own pasta for this one, since I needed it as a quick mid-week meal and I didn’t have any more fresh pasta on hand.  Two packages was too much – I’d recommend using a 1 ½ packages instead.
 
I love veggies in my pasta, so this was a win for me.  My kids, not so much.  But I will try again since it was so easy. Try for yourself and let me know what you think!


Pasta Primavera with Asparagus and Peas:

​INGREDIENTS:
  • ¼ pound sugar snap peas, stems trimmed
  • ½ pound asparagus, ends snapped
  • 2 tablespoons unsalted butter
  • ¾ cup fresh English peas
  • ¼ cup thinly sliced spring onion, white part only (or use shallot)
  • 2 garlic cloves, finely chopped
  • ½ teaspoon fine sea salt, more as needed
  •  Black pepper, more as needed
  • 12 ounces fettuccine or tagliatelle, preferably fresh 
  • ⅔ cup grated Parmigiano-Reggiano, at room temperature
  • ½ cup crème fraîche or whole milk Greek yogurt, at room temperature
  • 3 tablespoons finely chopped parsley
  • 1 tablespoon finely chopped tarragon

PREPARATION:
  1. Bring a large pot of heavily salted water to a boil over medium-high heat.
  2. While the water is coming to a boil, slice snap peas and asparagus stems into 1/4-inch-thick pieces; leave asparagus tips whole.
  3. Melt butter in a large skillet over medium-high heat. Add snap peas, asparagus, English peas and onion. Cook until vegetables are barely tender (but not too soft or mushy), 3 to 4 minutes. Stir in garlic and cook 1 minute more. Season with salt and pepper; set aside.
  4. Drop pasta into boiling water and cook until al dente (1 to 3 minutes for fresh pasta, more for dried pasta). Drain well and transfer pasta to a large bowl. Immediately toss pasta with vegetables, Parmigiano-Reggiano, crème fraîche and herbs. Season generously with salt and pepper, if needed.​
Picture

Skillet Chicken with Orzo, Dill and Feta

5/4/2021

 
Picture
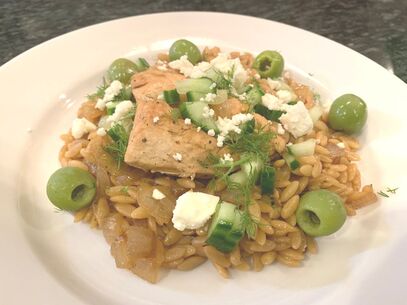
The Delaney Test Kitchen was excited to try this recipe from @NYTCooking that included Feta, since   a) I am always looking for something interesting to cook in our cast iron pan (it feels more Southern than a regular saute pan), and b) after the success of TikTok Feta, I was eager to try another Feta recipe.
 ​
This one was more of a hit with the adults than the kids, but I really loved it since it included two of my favorite things – dill and olives. I think with one minor change it will work with everyone. The recipe calls for cooking the orzo in chicken broth or water.  I found it to be so much more flavorful with the broth, but not as appetizing to my little picky eater. So if you have one of those, you may want to just use water.
 
My favorite flavor in this dish was from the dill.  It was a nice change from what we normally expect from chicken and pasta, and it always pairs well with feta.
 
If you try this one, please let me know how it goes!

Skillet Chicken with Orzo, Dill and Feta

INGREDIENTS:

  • 2 lemons
  • 5 tablespoons olive oil
  • 3 garlic cloves, smashed
  • 1 teaspoon kosher salt
  • 1 teaspoon black pepper
  • 2 pounds chicken drumsticks or bone-in thighs
  • 1 yellow onion, peeled and chopped
  • 2 cups orzo
  • 3 cups chicken broth or water
  • 2 small or 1 large thin-skinned (English) cucumbers, chopped
  • 5 ounces feta, crumbled (about 1 1/4 cups)
  • 2 tablespoons chopped fresh dill
  •  Castelvetrano or other green olives, for serving
PREPARATION:
  1. Cut one of the lemons into wedges and set aside. Juice the remaining lemon and combine with 3 tablespoons olive oil, garlic, salt and pepper, in a large resealable plastic bag or in a bowl, along with the chicken pieces. Seal and shake the bag (or stir in the bowl) to coat. Set aside for 30 minutes, or refrigerate up to overnight.
  2. Heat the remaining 2 tablespoons olive oil in a large cast-iron skillet over medium-high heat. Remove the chicken from the marinade, letting the excess drip off, and cook until lightly golden all over, turning when the chicken releases easily from the pan, about 12 minutes total. Transfer chicken to a plate and set aside.
  3. Add the onion to the pan and stir to coat with the remaining fat. Decrease heat to medium and cook until soft, about 4 minutes. Stir in the orzo and the broth or water. Cook until the liquid is partly absorbed, stirring occasionally, about 5 minutes. Top with the chicken legs and cover with a lid or foil. Continue cooking until the orzo is tender, most of the liquid is absorbed, and the chicken is cooked through, 15 to 20 minutes more, depending on the size of your drumsticks or thighs. Remove from the heat and scatter the cucumber, feta and dill over the top. Serve from the skillet with lemon wedges and olives.
Tip:
  • Some cast-iron skillets come with a matching lid, which is useful for making the skillet operate a bit like a mini stove-top oven, cooking evenly and basting the food with flavor and steam. If you don’t have one, use a lid from another pan, or two layers of thick foil, folded at the center and large enough to cover your pan.

Picture
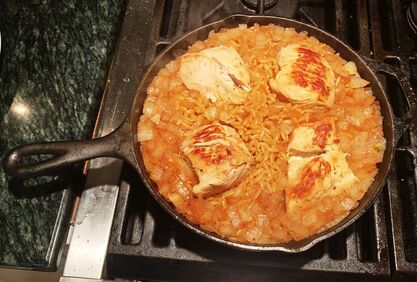
Chicken, Orzo and Onion in the pan before adding cucumber, feta, dill or olives.

Buttermilk-Brined Roast Chicken

5/2/2021

 
Picture
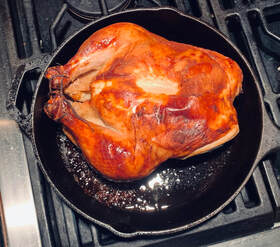
I am so tired of my standard chicken recipes, and I seem to have a lot of extra buttermilk around these days from all of my baking experiments. So I was excited to come across this recipe for Buttermilk-Brined Roast Chicken from NYT Cooking.  This recipe is adapted from Samin Nosrat’s "Salt Fat Acid Heat" (which I loved) and is inspired by the Southern grandma method of marinating chicken overnight in buttermilk before frying it.  This was an easy recipe to follow, and as promised the skin was nice and crispy and the chicken was juicy and perfect. The boys made it disappear.  We’ll be adding this to the rotation.  The only thing that makes this a little tricky is that you need to think about it the night before so that it has time to properly marinate. And since you have to take it out of the fridge an hour ahead of cooking, my recommendation is to cook this on a Friday or Saturday night when you may have just a little bit more time. Beyond that, enjoy! And let me know how yours turns out!

Buttermilk-Brined Roast Chicken, by Samin Nosrat
INGREDIENTS:
  • 1 chicken, 3 1/2 to 4 pounds
  •  Kosher salt or fine sea salt
  • 2 cups buttermilk

PREPARATION:
  1. The day before you want to cook the chicken, remove the wingtips by cutting through the first wing joint with poultry shears or a sharp knife. Reserve for stock. Season chicken generously with salt and let it sit for 30 minutes.
  2. Stir 2 tablespoons kosher salt or 4 teaspoons fine sea salt into the buttermilk to dissolve. Place the chicken in a gallon-size resealable plastic bag and pour in the buttermilk. (If the chicken won’t fit in a gallon-size bag, double up 2 plastic produce bags to prevent leaks and tie the bag with twine.)
  3. Seal the bag, squish the buttermilk all around the chicken, place on a rimmed plate, and refrigerate for 12 to 24 hours. If you’re so inclined, you can turn the bag periodically so every part of the chicken gets marinated, but that’s not essential.
  4. Pull the chicken from the fridge an hour before you plan to cook it. Heat the oven to 425 degrees with a rack set in the center position.
  5. Remove the chicken from the plastic bag and scrape off as much buttermilk as you can without being obsessive. Tightly tie together the legs with a piece of butcher’s twine. Place the chicken in a 10-inch cast-iron skillet or a shallow roasting pan.
  6. Slide the pan all the way to the back of the oven on the center rack. Rotate the pan so that the legs are pointing toward the rear left corner and the breast is pointing toward the center of the oven. (The back corners tend to be the hottest spots in the oven, so this orientation protects the breast from overcooking before the legs are done.) Pretty quickly you should hear the chicken sizzling.
  7. After about 20 minutes, when the chicken starts to brown, reduce the heat to 400 degrees and continue roasting for 10 minutes.
  8. Move the pan so the legs are facing the rear right corner of the oven. Continue cooking for another 30 minutes or so, until the chicken is brown all over and the juices run clear when you insert a knife down to the bone between the leg and the thigh. If the skin is getting too brown before it is cooked through, use a foil tent. Remove it to a platter and let it rest for 10 minutes before carving and serving.

Creamy Vegan Pasta

5/1/2021

 
Picture
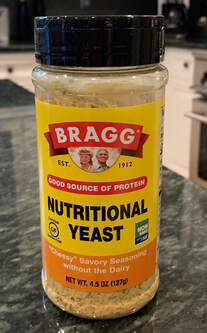
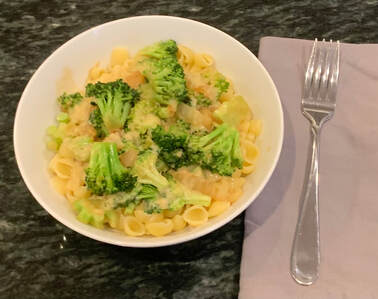
Have you heard of nutritional yeast?  I had not. So when I found this yummy-sounding recipe for Creamy Vegan Pasta, I was surprised as I tried to line up all the ingredients and found Nutritional Yeast on the list. 
 
How had I not heard of this before? It has 5g of protein per serving, and is packed with B vitamins, and is an excellent source of Thiamin, Riboflavin, Niacin, Folic Acid and Vitamins B6 and B12. It is used as an additive to add a savory cheese-like flavor to vegan recipes. I found it next to the regular yeast in the supermarket aisle.
 
This recipe is from one of my favorite blogs, Love and Lemons. I could not get my kids to eat it, but I thought it was as yummy as I expected.  So this is a Working Mom Dinner but for my house – it’s only really for you and maybe one other possible diner. Plus I found that the sauce was really only enough for two servings.  (Perhaps I was heavy handed since it was yummy.) Another option is to save the second serving for an easy lunch the next day.

If you live in Atlanta and have been to Mirko Pasta, this sauce reminds me of that fabulous white bean dip they serve with your fresh Italian bread. Yum.
 
On the Love and Lemons website, they also recommend experimenting with this dish.  Some of their suggestions include:
  1. Switch the vegetables. Trying roasted broccoli, roasted cauliflower, brussels sprouts, roasted tomatoes, or market-fresh asparagus in the Spring.
  2. Skip the actual pasta and try this sauce over spaghetti squash or zucchini noodles. 
  3. Spice it up. Try adding few pinches of red pepper flakes or pickled jalapenos.
  4. Get creative with flavor add-ins like chopped sun-dried tomatoes, pesto or fresh basil leaves.  

If you try this one, please let me know how it turns out. And let me know if your kids like it, too.

Creamy Vegan Pasta (serves 4)
Ingredients:
  • 2½ cups small shell pasta
  • 1 tablespoon extra-virgin olive oil
  • 1 small yellow onion, chopped
  • 5 cups broccoli florets, chopped stems, and leaves (keep stems separate)
  • ¼ cup toasted pine nuts
  • lemon wedges, for serving
For the creamy vegan pasta sauce:
  • 1½ cups cooked white beans, drained and rinsed
  • ¼ cup vegetable broth, more as needed
  • 3 tablespoons fresh lemon juice
  • 2 tablespoons extra-virgin olive oil
  • ¼ cup nutritional yeast*
  • 1 garlic clove, minced
  • ¼ teaspoon onion powder
  • ½ teaspoon sea salt
  • freshly ground black pepper, to taste
Instructions:
  1. Make the sauce: In a blender, combine the white beans, broth, lemon juice, olive oil, nutritional yeast, garlic, onion powder, salt, and pepper, and blend until smooth. Set aside.
  2. Bring a large pot of salted water to a boil. Prepare the pasta according to the instructions on the package, cooking until al dente. Drain and set aside.
  3. Heat 1 tablespoon of olive oil in a large skillet over medium heat. Add the onion and sauté until soft, about 5 minutes.
  4. Stir in the chopped broccoli stems and cook for another 3 to 5 minutes or until tender. Add the broccoli florets and leaves and a splash of water or vegetable broth. Cover and turn off the heat.
  5. Allow the broccoli to steam for 2 to 3 minutes or until tender but still bright green. Add the pasta, then stir in ¾ of the sauce, adding more broth if the sauce is too dry.
  6. Season to taste with more salt, pepper and lemon juice, as desired, and portion into bowls. Divide the remaining sauce onto each bowl. Top with the pine nuts and serve with lemon wedges on the side.
Picture

    Author

    It doesn't matter how successful you are or how long your day is - there is only one question when you get home: what's for dinner? That is why I am always on the lookout for recipes that won't take more that 30 minutes to prepare, that are flavorful, and that (almost) everyone will eat. 

    Archives

    November 2025
    October 2025
    September 2025
    August 2025
    July 2025
    June 2025
    May 2025
    April 2025
    March 2025
    January 2025
    December 2024
    April 2024
    February 2024
    January 2024
    July 2023
    June 2023
    May 2023
    April 2023
    March 2023
    February 2023
    January 2023
    November 2022
    September 2022
    August 2022
    June 2022
    March 2022
    February 2022
    January 2022
    December 2021
    October 2021
    August 2021
    June 2021
    May 2021
    April 2021
    March 2021
    February 2021
    January 2021

    Categories

    All
    Air Fryer Recipe
    Appetizers
    Easy Dinners
    Lunch
    One Pot Dinner
    Pasta
    Sheet Pan Dinner
    Skillet Dinner
    Slow Cooker Dinner

Proudly powered by Weebly
  • Home
  • Busy Mom Dinners
  • Easy Lunches
  • Travel Itineraries
  • Travel Blog
  • FULLY BOOKED!
  • Breads & Baking
  • Veggies & Bevvies
  • Beige Food for My Boys
  • Links
  • Other "Dishes" (art, fashion, etc...)
  • About Me