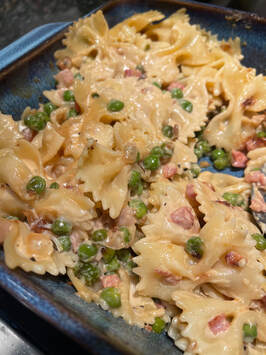
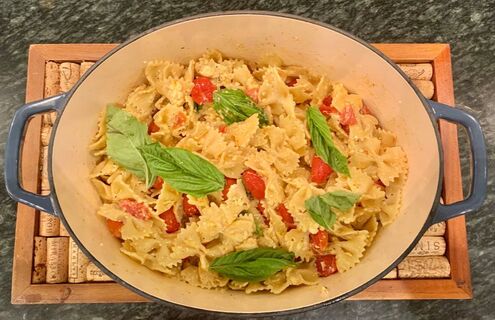
 This recipe has come up in my food feeds for a while now and it looked yummy, but I found the recipe on Allrecipes.com when I finally went looking for it. And there Stanley told them that he'll even eat it for breakfast because it's so good. It all started out when he was trying to find a use for some leftover farfalle pasta. When I tell you how Ah-mazing this was, I am not exaggerating. I was a big Stanley Tucci fan before, but now I might be his biggest fan. Needless to say, this was a huge hit in the Delaney Test Kitchen. And yes, I also had it for breakfast the next day. Enjoy! Ingredients:
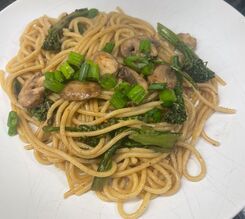 This recipe for Mushroom Pasta Stir-Fry from New York Times Cooking sounded like it might be a nice change from "regular" pasta for us, and allow me to add some flavors and taste dimensions during a busy week. And I was right. We all loved this, and it was easy to pull together. This was a Delaney Test Kitchen success for sure. I hope you enjoy it as well. INGREDIENTS: FOR THE PASTA:
PREPARATION: Step 1: Bring a large pot of salted water to a boil. Add pasta and cook according to package instructions, until al dente. Reserve 1 cup of pasta cooking water, then drain the pasta. Step 2: Meanwhile, heat a large (12-inch), deep skillet over medium-high. When hot, add 2 tablespoons oil and the mushrooms. Cook for 7 to 8 minutes, giving it a stir every 2 minutes or so. T he mushrooms will release lots of liquid, but it will evaporate as it cooks. When the mushrooms start to turn golden, add the garlic, five spice and ½ teaspoon each salt and black pepper, then cook for 1 minute. Transfer the mushrooms to a plate and set aside. Step 3: While the mushrooms are cooking, make the sauce: In a small bowl, whisk the oyster sauce, maple syrup, soy sauce, sesame oil and chile oil with ¼ cup water until combined. Set aside. Step 4: Heat the same skillet back over medium-high. Add the remaining 2 tablespoons oil and the broccolini. Season with salt and pepper and cook for 4 to 5 minutes, tossing occasionally, until the broccolini is tender but still quite crisp. Step 5: Add the pasta to the pan, along with the sauce and the butter. Using tongs, toss to combine, then add the reserved pasta cooking water, ¼ cup at a time, just to loosen the sauce. When the butter has melted, add the mushrooms and toss again. Remove from the heat. Serve topped with scallions. 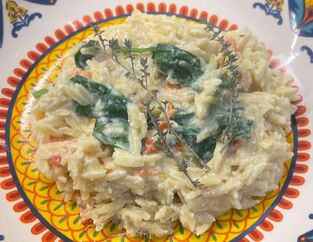 This is one of many recipes videos my husband found when scrolling social media and sent my way. And this one sounded so good so I thought we'd give it a try in the Delaney Test Kitchen. It was easy, but definitely lacked something in terms if dimension with the flavor. If I make it again, I think I might try adding some chili infused oil when I toss it at the end, or add a sprinkling of chili flakes right before I add the spinach. With a little bit more pop I think this one is a winner. Garlicky Ricotta Orzo INGREDIENTS: 250 g ricotta (approx. 8.8oz) 1 garlic bulb (top removed) 12 cherry tomatoes 1 Tablespoon olive oil Salt & Pepper to taste 6 thyme sprigs Handful of spinach 140 g uncooked orzo (approx. 5ounces) 1 cup reserved pasta water Grated Parmesan cheese and thyme leave for topping PREPARATION: 1.Pre-heat oven to 200 C (392 F) 2.Place ricotta, tomatoes, and garlic on a baking dish, drizzle with olive oil, season with salt & pepper, and top with sprigs of thyme. Bake for 30-35 minutes, until the garlic is tender. 3.Squeeze the roasted garlic, peel the tomatoes (if desired) and strip the thyme. Discard thyme stems. 4.Add spinach to the hot ingredients (it will wilt from the heat). 5.Cook the orzo according to package directions. 6.Mix the pasta water with the baked ingredients, and then add the orzo. 7.Adjust seasoning to taste and serve with grated parmesan and thyme sprigs on top. 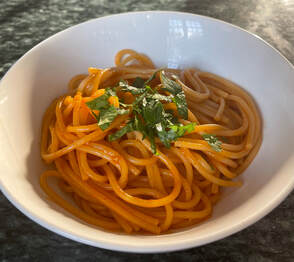 Pasta is always an easy meal when the week is busy, but it needs some help to keep it interesting. This recipe from New York Times Cooking can be made with spaghetti or ramen (I used spaghetti for the first try in the Delaney test kitchen) and overall it was super easy. I was able to make it with ingredients we had on hand, which is always a bonus. I also found that it had quite a kick, which made it a hit with the spicy/hot food lovers in my family. So yes - this will make it into the dinner rotation for us.
Gochujang Buttered Noodles INGREDIENTS:
PREPARATION:
TIPS
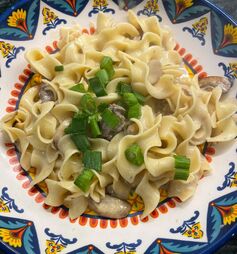 There are some recipes that remind me of my childhood, and I know this one was a staple because it wasn't expensive. You could make it with lesser cuts of meat it didn't matter. But there's something about that gravy and the egg noddle that warm my heart and my bones on a chilly fall day. My husband asked me to make it, and it turns out the kids loved (!) it. I love that it's a virtual hug. Oh - and that it is so easy! Prep time was 15 minutes and cook time was 15 minutes. That's perfect for a weeknight meal.
The recipe I liked the most is from Natasha's Kitchen, and she shares a little of the history of the dish as well, which I loved: "Beef Stroganoff was invented in Russia in the early 1800’s. Count Stroganoff was a dignitary in the court of Alexander III. Count Stroganoff’s chef (who was likely French), created the dish and named it after Stroganoff. I found a picture of Count Pavel Stroganoff, but wish I could find the chef as well! The earliest known recorded recipe was published in this Russian cookbook published in 1871." Beef Stroganoff INGREDIENTS:
To Serve:
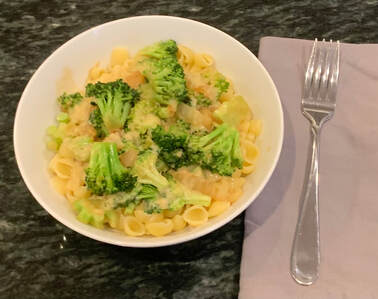
DIRECTIONS:
And - there are 2 critical factors for beef stroganoff: (1) quick searing of high quality beef and (2) the right proportions of sauce ingredients for a balanced sauce that makes the beef really shine. 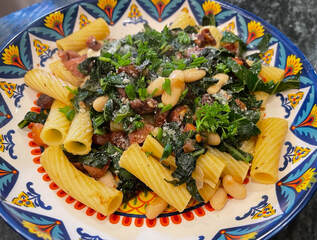 As a busy working mom, I am always on the lookout for yummy one-pot dinners. This one is actually two posts - one for boiling the pasta and one for everything else - but it was still easy. And this one was a bonus for the Delaney Test Kitchen since it has pasta in it – which is beige, and thus very popular in my house. This was a HUGE hit! And I even caught the boys actually eating the greens instead of picking them out. That is a solid win in my book. I’ve been asked to add this into our regular dinner rotation. And if you are worried about it being too spicy, it wasn't. It had just a light little kick that amped up the flavor. Pasta With Andouille Sausage, Beans and Greens INGREDIENTS: · Salt and black pepper · 1 pound rigatoni or any pasta with ridges · 2 tablespoons extra-virgin olive oil, plus more for drizzling · 12 ounces Andouille sausage, diced · 1 shallot, minced · 2 garlic cloves, minced · 1 bunch collard greens, stems discarded, leaves coarsely chopped (4 1/2 cups) · 1 tablespoon fresh thyme leaves · 1 (15-ounce) can cannellini beans, drained and rinsed · 1 cup diced fresh tomato (from 1 large) · ¼ cup chopped flat-leaf parsley · ¼ cup thinly sliced chives · 1 lemon, zested and cut into wedges, for serving · ¼ cup grated Parmesan, for serving PREPARATION: 1. Bring a large pot of salted water to a boil. Add pasta and cook until al dente according to the package’s instructions. 2. Meanwhile, heat oil in a large heavy-bottomed skillet over medium-high. Add sausage and cook, stirring occasionally, until browned, 5 to 7 minutes. Add shallot and garlic and cook, stirring often, until translucent, about 2 minutes. 3. Add collard greens and toss to wilt, 2 to 3 minutes. Season with salt and pepper. Add the thyme, cannellini beans and tomatoes and toss to warm through. Season again with salt and pepper to taste. 4. Reserve 1/2 cup pasta water and drain pasta. Return pasta to the empty pot and set over medium-low. Add the sausage mixture and toss to combine, gradually adding the reserved pasta water as needed to create a sauce. 5. Remove from the heat and sprinkle with parsley, chives, lemon zest and Parmesan. Season with salt and pepper to taste. Divide among bowls, drizzle with olive oil and serve with lemon wedges. 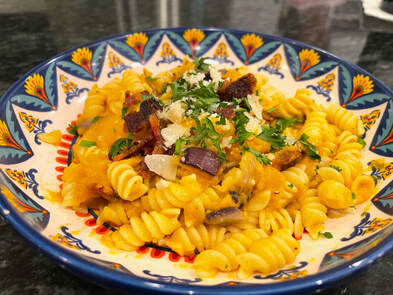 I am not a PSL fangirl, but I do love Fall cooking, especially with all the yummy autumn squashes. And the thought of combining squash flavors with pasta so that my boys might actually eat it was a challenge I was willing to take. This recipe did not take long, was not difficult, and was a huge hit. I added some extra red pepper flakes to give it a kick so that the guys would like it and it worked - my older son loved it! I’ve been asked to add it to our regular rotation of dinners. In our house, that is high praise. So this one was a definite win for the Delaney Test Kitchen. Enjoy!
Butternut Squash Pasta with Bacon and Parmesan INGREDIENTS:
PREPARATION:
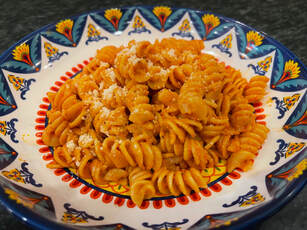 So there are a few recipes circulating around on Tiki Tok and social, and I've tried a few of them with mixed results. But this one looked easy and the reviews were all solid so I tried it in the Delaney Test Kitchen. And my family LOVED it. They even asked that it be added into the regular rotation. Its definitely worth a try - I hope you love it, too. And thanks for sharing, Gigi!
Gigi Hadid's Spicy Vodka Pasta Sauce INGREDIENTS: ¼ c olive oil 1 clove garlic 1 shallot 1T fresh Basil 1 small can of tomato paste 1T vodka ½ c heavy cream ½ c grated parmesan separated (1/4 for recipe and ¼ for topping) 1 t Chili flakes (I recommend closer to 1 T) 1T butter 16 oz pasta (I recommend Rotini) Salt & pepper to taste PREPARATION: 1. Dice the garlic and shallot. 2. Heat ¼ c of olive oil in a large saucepan, add the shallot and garlic, and cook until soft (2-3 mi nutes). 3. Add the tomato paste and cook until the sauce is a bit darker and carmelized 4. Add 1 tablespoon vodka and cook until it almost evaporates. (You can also skip the vodka altogether if you prefer.) 5. Add 1/2 cup heavy cream and chili flakes (1t, or more if you like it hotter). Keep stirring until the sauce is combined. Season with salt & pepper to taste. Remove the sauce form the heat. 6. Cook the pasta according to directions on the box. Before draining it, save 1/4 cup or more of the pasta water. 7. Add the cooked (& drained) pasta, the 1/4 cup reserved pasta water, and 1 tablespoon butter to the red sauce in the large saucepan. Stir over medium heat till the butter has melted and the sauce looks done. (note: if your sauce is too thick or simply not saucy enough, slowly add the additional pasta water you put aside earlier until it reaches your desired consistency.) 8. Add ¼ c Parmesan Cheese and stir. 9: Serve Topped with Parmesan Cheese and Chopped Basil. 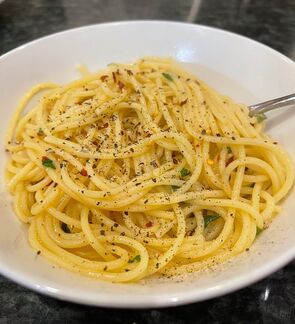 I love that the story behind this recipe is that its pasta you can easily make in the middle of the night with just a few pantry staples. With a teenaged boy in the house, he makes a fifth meal every night at 11:30pm or 12am. This is another option for him, and for the family.
This recipe from New York Times Cooking does seem a little bit more complicated since it requires roasting the garlic ahead of time. For me, I put the garlic in the oven while I worked out, and then made dinner an hour later and it was perfect. You can always make a lot of roasted garlic at once and save it for up to 2 weeks in the fridge or 2 months in the freezer. Then it truly can be a Midnight Pasta. For the record – this was also a hit. I served some non-chile pasta to my 11 year old, but the rest of us enjoyed the spicy recipe as is. Yum! Midnight Pasta with Roasted Garlic, Olive Oil and Chile INGREDIENTS: · 1 large head of garlic · Kosher salt · ½ cup plus 1 teaspoon extra-virgin olive oil · 1 cup firmly packed parsley leaves · 1 pound spaghetti or other long pasta · ½ teaspoon red-pepper flakes, plus more for garnish · Black pepper · Freshly grated Parmesan, for serving PREPARATION: Step 1:
Step 2:
Step 3:
Step 4:
Step 5:
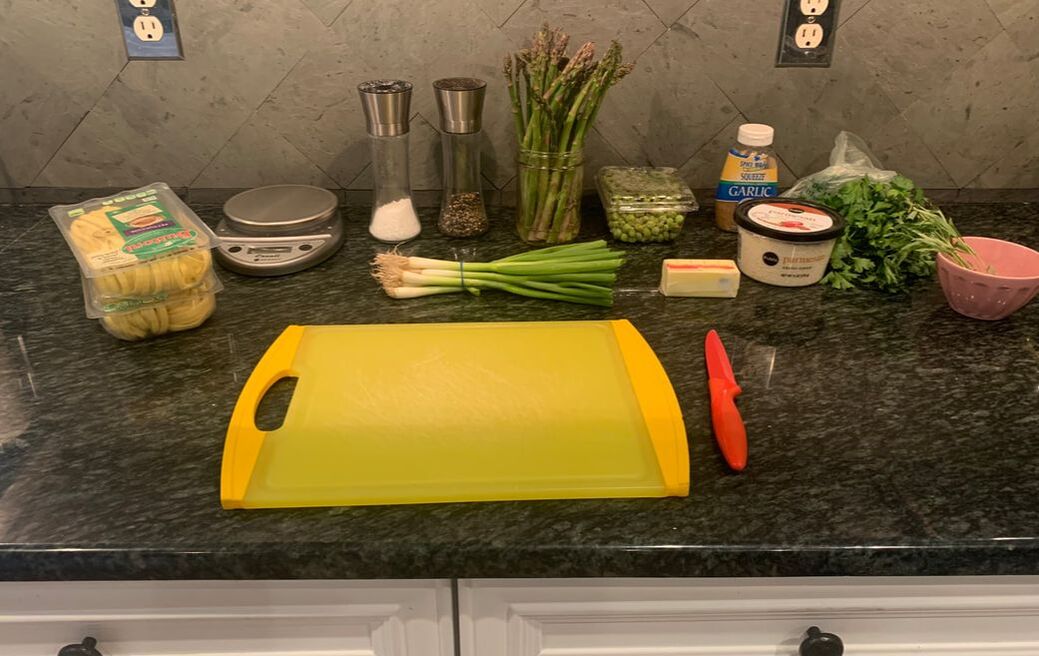
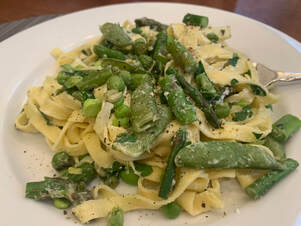 I love asparagus, but I am so tired of just steaming it. I was looking for another option when I found this recipe for Pasta Primavera with Asparagus and Peas from the New York Times Cooking. So I decided to give it a try in the Delaney Test Kitchen. You’ll see that the recipe calls for crème fraiche or whole milk Greek yogurt. I went the yogurt route to be a little more healthy, but I could see how the crème fraiche would have added more flavor. I also felt that there wasn't enough sauce, so I used 1/4 cup of the pasta water when I mixed it all together and that worked great. I also used Buitoni Fettuce from the supermarket instead of making my own pasta for this one, since I needed it as a quick mid-week meal and I didn’t have any more fresh pasta on hand. Two packages was too much – I’d recommend using a 1 ½ packages instead. I love veggies in my pasta, so this was a win for me. My kids, not so much. But I will try again since it was so easy. Try for yourself and let me know what you think! Pasta Primavera with Asparagus and Peas: INGREDIENTS:
PREPARATION:
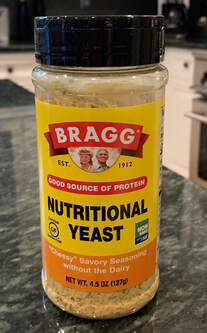
  Have you heard of nutritional yeast? I had not. So when I found this yummy-sounding recipe for Creamy Vegan Pasta, I was surprised as I tried to line up all the ingredients and found Nutritional Yeast on the list. How had I not heard of this before? It has 5g of protein per serving, and is packed with B vitamins, and is an excellent source of Thiamin, Riboflavin, Niacin, Folic Acid and Vitamins B6 and B12. It is used as an additive to add a savory cheese-like flavor to vegan recipes. I found it next to the regular yeast in the supermarket aisle. This recipe is from one of my favorite blogs, Love and Lemons. I could not get my kids to eat it, but I thought it was as yummy as I expected. So this is a Working Mom Dinner but for my house – it’s only really for you and maybe one other possible diner. Plus I found that the sauce was really only enough for two servings. (Perhaps I was heavy handed since it was yummy.) Another option is to save the second serving for an easy lunch the next day. If you live in Atlanta and have been to Mirko Pasta, this sauce reminds me of that fabulous white bean dip they serve with your fresh Italian bread. Yum. On the Love and Lemons website, they also recommend experimenting with this dish. Some of their suggestions include:
If you try this one, please let me know how it turns out. And let me know if your kids like it, too. Creamy Vegan Pasta (serves 4) Ingredients:
  Like everything else during the pandemic, I am late to the baked feta and pasta trend and controversy. So I had to see was it was all about. I found the original recipe and gave it a try. Suffice it to say that there were no leftovers. It was a hit, it was easy, and it was really yummy. The salty baked feta, the sweet cherry tomatoes, the fresh garlic and basil all made the house smell fantastic. I don’t have any edits or suggestions to add to the recipe, other than I increased the garlic a little bit and thought it was perfect, and they are right that it works best in a smaller baking dish so that all of the flavors can co-mingle. And adding the pinch of red pepper flakes once it is done cooking gave it just a enough of a kick. Give it a try and let me know what you think! Baked Feta Pasta – Tiktok Original Ingredients:
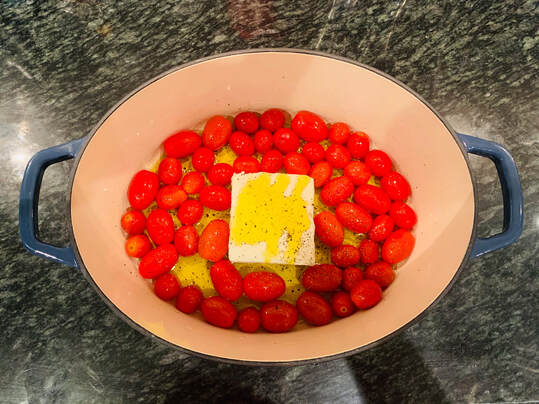 TikTok Feta Pasta - Before Cooking 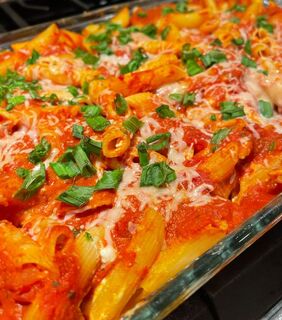 Easy Low Fat Baked Ziti This is an easy, yummy recipe that evolved over time. Plus its only one dish, which makes cleanup easy.
Ingredients: 16oz box of ziti, penne, or rigatoni One onion One green pepper 8oz of cottage cheese 8oz neufchatel cream cheese 32oz jar of your favorite pasta sauce (we prefer Michaels of Brooklyn’s Home Style Gravy) 4oz of low fat shredded mozzarella (1/2 a package) Pam or olive oil cooking spray And for this recipe, I use a 3Qt. pyrex glass rectangular baking dish Step 1: Bring a large pot of water to a boil. Add the pasta and cook as per the box instructions (usually around 11 minutes). Step 2: Place the Neufchatel cheese (still in the wrapper) near the pasta pot to help soften it to make it easier for mixing later. Step 3: Slice a medium sized onion into chunks. Step 4: Remove the seeds from the green pepper and cut in to small chunks. Step 5: Lightly spray the inside of the baking dish with Pam. Step 6: When the pasta is done cooking, drain it and then add to the pyrex dish. Step 5: Mix the pasta with the peppers and onions. Step 6: Mix in the cottage cheese, and remove the wrapper from the Neufchatel cheese to add it as well. Step 7: Once thoroughly mixed, pour the pasta sauce over the top. Mix it to make sure it is evenly distributed throughout the dish. Step 8: Sprinkle the top with the shredded low-fat mozzarella cheese. Step 9: Cover with foil and bake at 350F for 30 minutes. Remove the foil for the last 10 minutes. |
AuthorKris Delaney is a marketing executive, foodie, travel enthusiast, and book nerd based in Atlanta, GA. Archives
July 2023
Categories
All
|
 RSS Feed