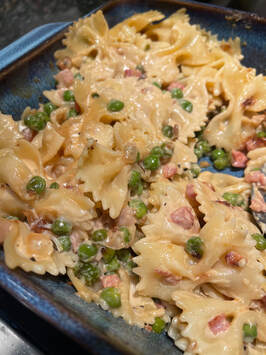
 This recipe has come up in my food feeds for a while now and it looked yummy, but I found the recipe on Allrecipes.com when I finally went looking for it. And there Stanley told them that he'll even eat it for breakfast because it's so good. It all started out when he was trying to find a use for some leftover farfalle pasta. When I tell you how Ah-mazing this was, I am not exaggerating. I was a big Stanley Tucci fan before, but now I might be his biggest fan. Needless to say, this was a huge hit in the Delaney Test Kitchen. And yes, I also had it for breakfast the next day. Enjoy! Ingredients:
 This recipe from Eating Well was an instant hit. My husband even saved all of the extra sauce to use with rice at another meal. The flavors are wonderful, but this is NOT a quick weeknight meal. You need to give yourself a little more time with this one - it took no less than 1hr and 15 minutes total. I served it with basmatic rice, but it would be great with naan as well. INGREDIENTS:
1. Heat 4 tablespoons oil in a large skillet over medium-low heat. Add onions and cook, stirring frequently, until caramelized and slightly crispy, 25 to 30 minutes. Transfer to a blender and add cashews and water. Blend until smooth. 2. Combine yogurt, garam masala, cardamom, cayenne, coriander, turmeric and saffron in a medium bowl. Set aside. 3. Place the pan over medium heat and add the remaining 1 tablespoon oil. Add peppercorns (I used freshly ground black pepper), the bay leaf and the cinnamon stick and toast until fragrant, 10 to 15 seconds. Add chicken, garlic and ginger and cook, stirring occasionally, until the chicken starts to brown, 5 to 7 minutes. 4. Stir in the pureed onion mixture, the yogurt mixture, the broth and salt. Adjust heat to maintain a low simmer, partially cover and cook, stirring occasionally, until the chicken is tender and reaches an internal temperature of 165°F, about 20 minutes. Discard the bay leaf and cinnamon stick. Garnish with cilantro, if desired. 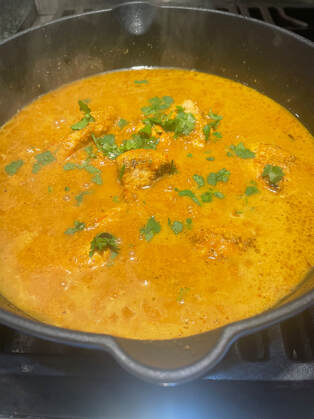 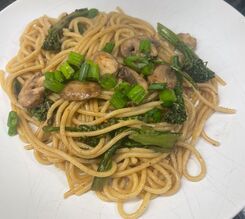 This recipe for Mushroom Pasta Stir-Fry from New York Times Cooking sounded like it might be a nice change from "regular" pasta for us, and allow me to add some flavors and taste dimensions during a busy week. And I was right. We all loved this, and it was easy to pull together. This was a Delaney Test Kitchen success for sure. I hope you enjoy it as well. INGREDIENTS: FOR THE PASTA:
PREPARATION: Step 1: Bring a large pot of salted water to a boil. Add pasta and cook according to package instructions, until al dente. Reserve 1 cup of pasta cooking water, then drain the pasta. Step 2: Meanwhile, heat a large (12-inch), deep skillet over medium-high. When hot, add 2 tablespoons oil and the mushrooms. Cook for 7 to 8 minutes, giving it a stir every 2 minutes or so. T he mushrooms will release lots of liquid, but it will evaporate as it cooks. When the mushrooms start to turn golden, add the garlic, five spice and ½ teaspoon each salt and black pepper, then cook for 1 minute. Transfer the mushrooms to a plate and set aside. Step 3: While the mushrooms are cooking, make the sauce: In a small bowl, whisk the oyster sauce, maple syrup, soy sauce, sesame oil and chile oil with ¼ cup water until combined. Set aside. Step 4: Heat the same skillet back over medium-high. Add the remaining 2 tablespoons oil and the broccolini. Season with salt and pepper and cook for 4 to 5 minutes, tossing occasionally, until the broccolini is tender but still quite crisp. Step 5: Add the pasta to the pan, along with the sauce and the butter. Using tongs, toss to combine, then add the reserved pasta cooking water, ¼ cup at a time, just to loosen the sauce. When the butter has melted, add the mushrooms and toss again. Remove from the heat. Serve topped with scallions. 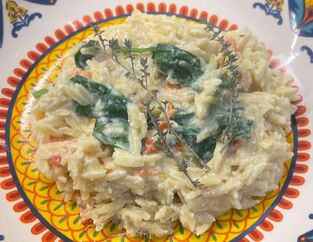 This is one of many recipes videos my husband found when scrolling social media and sent my way. And this one sounded so good so I thought we'd give it a try in the Delaney Test Kitchen. It was easy, but definitely lacked something in terms if dimension with the flavor. If I make it again, I think I might try adding some chili infused oil when I toss it at the end, or add a sprinkling of chili flakes right before I add the spinach. With a little bit more pop I think this one is a winner. Garlicky Ricotta Orzo INGREDIENTS: 250 g ricotta (approx. 8.8oz) 1 garlic bulb (top removed) 12 cherry tomatoes 1 Tablespoon olive oil Salt & Pepper to taste 6 thyme sprigs Handful of spinach 140 g uncooked orzo (approx. 5ounces) 1 cup reserved pasta water Grated Parmesan cheese and thyme leave for topping PREPARATION: 1.Pre-heat oven to 200 C (392 F) 2.Place ricotta, tomatoes, and garlic on a baking dish, drizzle with olive oil, season with salt & pepper, and top with sprigs of thyme. Bake for 30-35 minutes, until the garlic is tender. 3.Squeeze the roasted garlic, peel the tomatoes (if desired) and strip the thyme. Discard thyme stems. 4.Add spinach to the hot ingredients (it will wilt from the heat). 5.Cook the orzo according to package directions. 6.Mix the pasta water with the baked ingredients, and then add the orzo. 7.Adjust seasoning to taste and serve with grated parmesan and thyme sprigs on top. 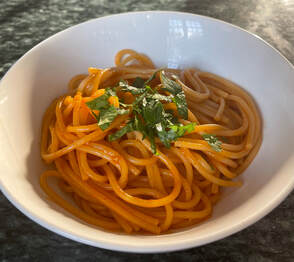 Pasta is always an easy meal when the week is busy, but it needs some help to keep it interesting. This recipe from New York Times Cooking can be made with spaghetti or ramen (I used spaghetti for the first try in the Delaney test kitchen) and overall it was super easy. I was able to make it with ingredients we had on hand, which is always a bonus. I also found that it had quite a kick, which made it a hit with the spicy/hot food lovers in my family. So yes - this will make it into the dinner rotation for us.
Gochujang Buttered Noodles INGREDIENTS:
PREPARATION:
TIPS
 I am always on the lookout for a dinner that is clean eating, easy to make, and appeals to the varied tastes of my crew. We tried this one from cookforyourlife.org in the Delaney Test Kitchen and we all loved it! Even those (the kids) who don’t normally like mushrooms. This one is worth adding into your weeknight rotation.
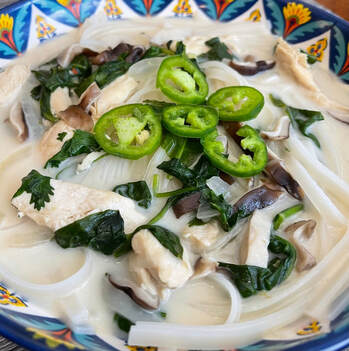
Chicken & Noodles in Coconut Lime Broth INGREDIENTS:
 My whole family loves (!) ramen, so when I saw this recipe on allrecpies.com knew I needed to give this one a try. The only thing to know is that if you make this, it's not going to be a quick dinner. It'll take about an hour, which is fine but doesn't always work on nights with soccer practices. That being said, it was a huge hit in the Delaney Test Kitchen, even thought we ate a bit later than usual. I skipped the egg for us on the trial run, but I put out all of our hot sauces on the table so that everyone could customize their bowls. It was Yum!
Chicken Ramen Bowl Ingredients:
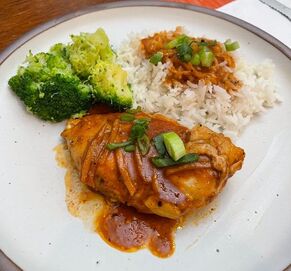
 I found this recipe in the December/January issue of Allrecipes.com, and it looked liked it checked all the boxes for the Fam so I gave it a try in the Delaney Test Kitchen. And by that I mean it was only supposed to take 20 minutes total. What!? This one really was so easy, and the sauce was delish. The red pepper flakes at the end really give it the flavor it is missing otherwise, which is great because then everyone can regulate their desired level heat for themselves. We were still at the table when I was asked to add to to our regular rotation. For me, that is a win!
Bulgogi-Style Skillet Chicken Ingredients
1. For sauce: Whisk together white and light green parts of the green onion, soy sauce, brown sugar, garlic, sesame oil, sesame seeds, cayenne pepper, salt, and black pepper together in a bowl until marinade is smooth. 2. Cook and stir chicken and marinade together in a large skillet over medium-high heat until chicken is cooked through, about 15 minutes. 3. Divide rice and chicken evenly among four bowls and drizzle with sauce from the skillet. Garnish with reserved dark green onion. Serve with crushed red pepper. 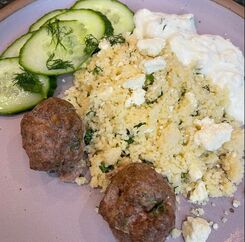 When looking for meals that appeal to all of my kids, meatballs and orzo are always easy wins. This one from eatingwell.com looked like it needed a tryout in the Delaney Test Kitchen. It appealed to the adults as well as the kids thanks to the additional flavor of dill and the saltiness of the feta. I really liked this one for both ease and flavor. And then the kids have specifically asked for it again on numerous occasions. That qualifies as a win for me. Enjoy!
Meatballs with Lemon-Garlic Orzo INGREDIENTS:
1. Preheat oven to 425°F. Coat a large-rimmed baking sheet with cooking spray. 2. Mix lamb (or beef), egg, 2 tablespoons parsley, mint, 1 teaspoon garlic and salt in a medium bowl. Form into 12 balls and place on the prepared pan. Bake until browned and cooked through, about 20 minutes. 3. Meanwhile, bring a large saucepan of water to a boil. Cook orzo according to package directions. Drain and let cool for 5 minutes. 4. Mix oil, dill, lemon zest and lemon juice along with the remaining 2 tablespoons parsley and 2 teaspoons garlic in a medium bowl. Transfer 1 tablespoon of the herb mixture to a small bowl and stir in yogurt and 1/4 cup feta. 5. Add the orzo to the medium bowl and stir in the remaining 3/4 cup feta. Serve the meatballs with the orzo, yogurt sauce and cucumbers.  It's Spring, and so it is officially burger season. But sometimes we want something with more flavor than a regular cheeseburger. This recipe for Bahn Mi Burgers is the perfect antidote and an interesting combination of Bahn Mi flavors and a traditional sandwich crossed with a. burger. The original recipe is from allrecipes.com, and it couldn't be easier. Our family gave it 5 stars! Enjoy!
The Bahn Mi Burger Ingredients: For the Burger: 1 pound ground beef chuck 1 teaspoon soy sauce 1 teaspoon fish sauce ½ teaspoon freshly ground black pepper ⅛ teaspoon five-spice powder For the Sandwich: ¼ cup mayonnaise 1 tablespoon hoisin sauce 2 teaspoons Sriracha 2 French sandwich rolls ½ cup julienned carrot ½ cup julienned daikon radish 1 tablespoon seasoned rice vinegar 8 thin slices English cucumber 2 tablespoons sliced jalapeno pepper, or to taste 1 tablespoon fresh cilantro leaves, or to taste Directions: Step 1: Combine beef, fish sauce, soy sauce, freshly ground black pepper, and 5-spice powder in a bowl, and mix until evenly combined. Cover with plastic wrap and refrigerate until chilled. Step 2: Mix mayonnaise, hoisin, and Sriracha together in a small bowl for sauce. Keep chilled until needed. Step 3: Preheat the oven to 400 degrees F (200 degrees C). Line a baking sheet with foil. Step 4: Cut open rolls, remove about 1/2 of the inside crumb, and place on the prepared baking sheet. Step 5: Bake rolls in the preheated oven until toasted, 5 to 10 minutes. Step 6: Meanwhile, using damp hands, shape beef mixture into two burger patties sized to match your rolls or buns. Keep in the refrigerator until needed. Step 7: Combine carrots and daikon radish in a bowl. Add rice vinegar and toss to coat. Refrigerate until needed. Step 8: Preheat a charcoal grill to high heat. Step 9: Cook burgers over the hot coals until desired doneness is reached and they spring back to the touch, turning as needed, about 4 minutes per side for medium-rare. An instant-read thermometer inserted into the centers should read at least 145 degrees F (63 degrees C). Step 10: Slather toasted buns with mayo mixture. Place cucumbers and jalapeno slices on bottom of rolls, and top with cooked burgers. Top with carrot-radish mixture and cilantro. 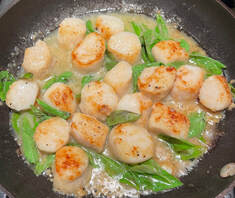 I really love scallops for a quick, healthy dinner. They were OK when I made them in the air fryer, but I wanted more texture and richer flavors. This recipe from inspiredtaste.com fits the bill. It is still easy to make, but it has more flavor and works really well over pasta. Seared Scallops with Garlic Basil Butter INGREDIENTS: · 12 large sea scallops, 1 ¼ to 1 ½ pounds · 2 teaspoons all-purpose flour, optional, see notes · Salt and fresh ground black pepper · 2 tablespoons oil, such as olive oil, avocado oil or grape seed oil · 1 ½ tablespoons butter · 2 garlic cloves, minced · 1 cup fresh basil leaves · 3 to 4 lemon slices DIRECTIONS: 1. Use a paper towel to pat the scallops dry. Dust one side of the scallops with a small amount of flour, and then season with salt and pepper. 2. Heat a wide skillet over medium-high heat. Add the oil to the pan. When the oil is hot and shimmery, carefully place the scallops, seasoned-side-down, into the pan. Cook, without moving them until browned, about 2 minutes. 3. While the first side is browning, dust the unseasoned side of the scallops with a bit of flour and season them with salt and pepper. 4. Flip the scallops — if any stick to the pan, wait a few more seconds then try again, gently wiggling them side to side to help release them. 5. Add the butter and garlic to the pan, and then swirl the butter around the pan as it melts. Cook another minute or two then take the pan off of the heat. Stir in the basil leaves and lemon slices. Serve.  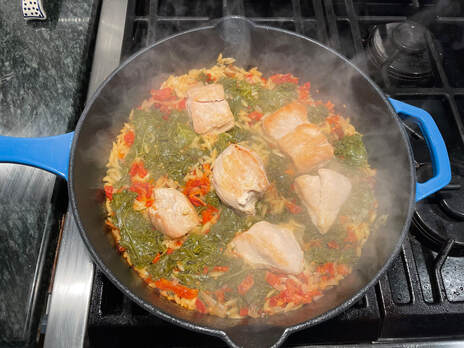 I love a good skillet dinner - one dish and easy cooking & clean up. I found this recipe on the Giadzy site from Giada De Laurentiis, and I had to give it a try in the Delaney Test Kitchen. It was a big success all around, and it sneakily served my picky eaters a lot of vegetables. I've made this numerous times already since we first tried it, and its always a hit. It only takes about 10 minutes to pull it together, and then it cooks for 30min. That's my kind of weeknight meal. Sun-Dried Tomato Chicken Orzo Skillet Ingredients:
 I like to use my slow cooker on the weekends, especially when we have so much other stuff going on. It's nice to know that with just a little bit of prep early in the day, that dinner is already taken care of. And I am always on the lookout for something different to make in the slow cooker. This recipe from allrecipes.com sounded like it could be a winner so I gave it a try in the Delaney Test Kitchen.
This recipe could not have been easier to make, and I loved the Mediterranean feel to it. I did substitute chicken breasts for the thighs just based on what my family likes, and I doubled the red pepper flakes to give it a little more pop. And as suggested, I served it with a fresh loaf of bread to soak up all the sauce. Slow Cooker Tuscan Chicken Note: Prep time is 15 Minutes, Cook time is 4 Hours. Ingredients:
 My family loves Thai food, so a recipe that promises to be “Quick & Easy” and Thai-inspired had to have a go at the Delaney Test Kitchen. And this from Katerina at Diethood.com was a huge success that now gets regular requests. The Peanut Sauce was so easy that I’ve made it for other recipes, too.
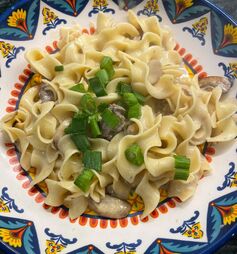 There are some recipes that remind me of my childhood, and I know this one was a staple because it wasn't expensive. You could make it with lesser cuts of meat it didn't matter. But there's something about that gravy and the egg noddle that warm my heart and my bones on a chilly fall day. My husband asked me to make it, and it turns out the kids loved (!) it. I love that it's a virtual hug. Oh - and that it is so easy! Prep time was 15 minutes and cook time was 15 minutes. That's perfect for a weeknight meal.
The recipe I liked the most is from Natasha's Kitchen, and she shares a little of the history of the dish as well, which I loved: "Beef Stroganoff was invented in Russia in the early 1800’s. Count Stroganoff was a dignitary in the court of Alexander III. Count Stroganoff’s chef (who was likely French), created the dish and named it after Stroganoff. I found a picture of Count Pavel Stroganoff, but wish I could find the chef as well! The earliest known recorded recipe was published in this Russian cookbook published in 1871." Beef Stroganoff INGREDIENTS:
To Serve:
DIRECTIONS:
And - there are 2 critical factors for beef stroganoff: (1) quick searing of high quality beef and (2) the right proportions of sauce ingredients for a balanced sauce that makes the beef really shine.
Coconut-Gochujang Glazed Chicken With Broccoli (serves 4)
INGREDIENTS:
PREPARATION:
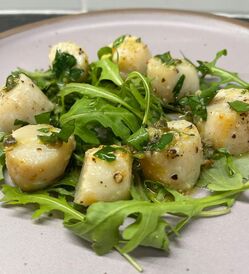 I am so tired of the Air-Fryer taking up room in my kitchen that I am committed to finding other purposed for it other than wings, fries and tater tots, and Brussels sprouts. This is the first recipe I tried that was a good alternative. I love scallops, but since no one else in my house does, I try to keep the portions small. This was also super quick, so I could easily replicate it for just me one one of those rare nights that I have to myself, or even for a wfh lunch. Air Fryer Scallops with Lemon-Herb Sauce
INGREDIENTS:
PREPARATION: 1. Sprinkle scallops with pepper and salt.2. Coat the basket of an air fryer with cooking spray. 3. Place scallops in the basket and coat them with cooking spray. 4. Place the basket in the fryer and cook at 400°F until they reach an internal temperature of 120°F, (about 6 minutes.) 5. Combine oil, parsley, capers, lemon zest and garlic in a small bowl. Drizzle over the scallops. 6. Serve with lemon wedges, if desired. 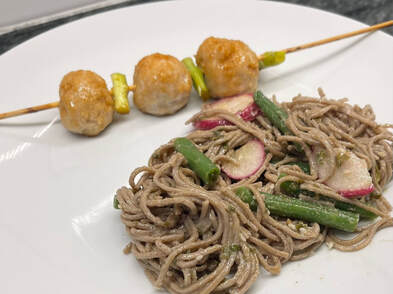 I used to work for a Japanese company, and it was there that I developed a love of all things yakitori. We would go to little yakitori places for lunch, but in Japan it is a common street food. In both places the yakitori is cooked over a charcoal grill that is long and skinny - just wide enough to hold the little skewers. Alternatively, this recipe is made with chicken meatballs that are baked in the oven. The soba noodles are so easy and are mixed with a sesame glaze and green beans. This is a complete meal that is easy, hits all the food groups, and it always a crowd pleaser. If you have big kids with big appetites, then be prepared to make extra. CHICKEN YAKITORI MEATBALL SKEWERS
with sweet soy glaze, green beans & soba noodle salad INGREDIENTS: 1 lb ground chicken 1/3 c panko Yakitori Seasoning: 4 t sesame oil, 1 t ginger paste, 1 t garlic, 1/4 t white pepper 6 green onions 12 bamboo skewers 1 T dried chives 1T lemongrass powder 1T ground ginger 1T toasted sesame seeds Glaze: 2 T tamari, 2 T mirin, 1 t sugar, 1 t rice vinegar 6 oz green beans 6 oz radishes 8 oz soba noodles 6 T sesame oil Olive Oil Salt & Pepper to taste 1. Preheat the Oven to 375° 2. Place skewers in water to soak 3. Prepare the vegetables:
4. In a med pot, heat sesame oil over med for 1 min Place the dried chives, lemongrass powder, dried ginger and toasted sesame seeds in a bowl. Mix well, and then pour the the heated sesame oil over it, stirring well. 5. Cook the Soba Noodles
6. Make the Yakitori
4. Place soba noodle salad onto plates and top with yakitori skewers 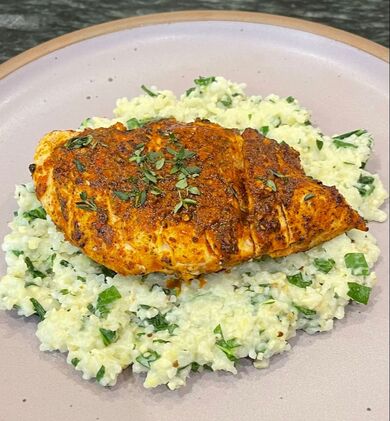 Peri Peri Chicken with Grits Peri Peri Chicken with Grits There is a chain of chicken restaurants that we discovered in the UK (and have since learned there are some in the US while on a visit to Washington, DC) called Nando's. They are famous for their Peri-Peri chicken, which comes in a variety of levels of spiciness. Peri Peri means "strong pepper" in Swahili, so the heat is to be expected. And we learned from friends that after a night out at the bars, Londoners will often go out for some "cheeky Nando's" to soak it all up. Since we all love PeriPeri and Nando's in our house, I was excited when this was a big hit with my family. We added it into our regular rotation, minus the grits and adding a little bit more spice. Instead of the grits, I often serve it with roasted fingerling potatoes. Peri Peri Chicken,
with creamy grits, chili peppers & wilted collard greens (serves 4) INGREDIENTS: 4 chicken breasts Peri Peri Spice: 2 T sumac, 2 T smoked paprika 6 T thyme, 4 Thai chilies, 2 garlic clove 6 T red wine vinegar 1 1/2 c grits 2 c milk 4 c collard greens 2/3 cup of Olive oil salt and pepper to taste PREPARATION: 1. Preheat oven to 400° 2. Cook Grits:
3. Make the Peri Peri Sauce
4. Cook the Chicken
5. Prepare the Collards, and Finish the Grits
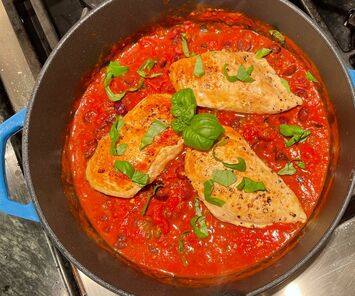 For picky eaters I can usually serve chicken, or something with red sauce at least and have a modicum of success. But sometimes the grown-ups in the house need more flavor, and I'd like to think that I'm training the little palates to enjoy future recipes. This is a one pot dinner (always awesome!) from Eating Well that ended up being a winner. The olives and capers add a nice little briny depth to the sauce. Yum!
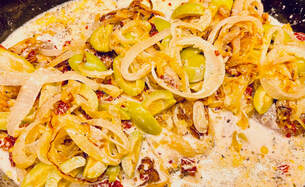
Chicken Puttanesca INGREDIENTS: - 2 Tablespoons extra virgin olive oil, divided - 4 chicken cutlets - 1/4 teaspoon salt, divided - 2 cloves of garlic, minced - 1 anchovy, minced (I skip this one when I make it) - 1/4 cup dry white wine - 1 14oz can of no salt added diced tomatoes - 1/4 cup pitted Kalamata olives, coarsely chopped - 1 Tablespoon capers, rinsed and coarsely chopped - Chopped fresh parsley for garnish DIRECTIONS: Step 1: Heat 1 tablespoon oil in a large skillet over medium-high heat. Pat chicken dry and sprinkle with 1/8 teaspoon each salt and pepper. Add to the pan and cook, flipping once, until browned and an instant-read thermometer inserted in the thickest part registers 165°F, about 6 minutes total. Transfer to a plate. Step 2: Reduce heat to medium. Add the remaining 1 tablespoon oil, garlic and anchovy; cook, stirring, until fragrant, about 30 seconds. Stir in wine, tomatoes and their juices and the remaining 1/8 teaspoon each salt and pepper. Cook, scraping up any browned bits, until reduced by half, about 10 minutes. Step 3: Stir in olives, capers and any accumulated juices from the chicken. Nestle the chicken into the sauce and garnish with parsley, if desired. 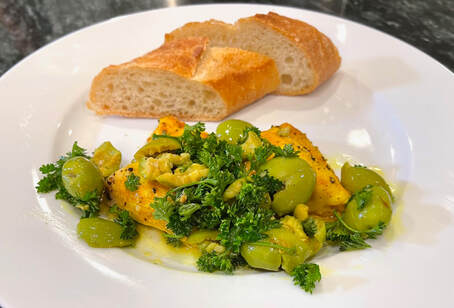 I love olives and their briny flavors. So when I saw this recipe for a variation on sheet pan chicken with both turmeric and olives, I had to give it a try in the Delaney Test Kitchen. This was a simple recipe that my husband and I enjoyed very much. The kids, not so much. Next time I’ll just give them marinara sauce and keep the olive dressing for ourselves.
Vinegar Chicken With Crushed Olive Dressing INGREDIENTS:
PREPARATION: 1. Heat oven to 450 degrees. Place chicken on a rimmed baking sheet and toss with turmeric and 2 tablespoons olive oil, and season with salt and pepper. Make sure chicken is skin-side up, then pour vinegar over and around chicken and place in the oven. 2. Bake chicken, without flipping, until cooked through and deeply browned all over, 25 to 30 minutes. 3. Meanwhile, combine olives, garlic, parsley, the remaining 4 tablespoons olive oil and 2 tablespoons water in a small bowl; season with salt and pepper. 4. Once chicken is cooked, remove baking sheet from the oven and transfer chicken to a large serving platter, leaving behind any of the juices and bits stuck to the pan. 5. Make sure the baking sheet is on a sturdy surface (the stovetop, a counter), then pour the olive mixture onto the sheet. Using a spatula or wooden spoon, gently scrape up all the bits the chicken left behind, letting the olive mixture mingle with the rendered fat and get increasingly saucy. Pour olive mixture over the chicken, then serve. 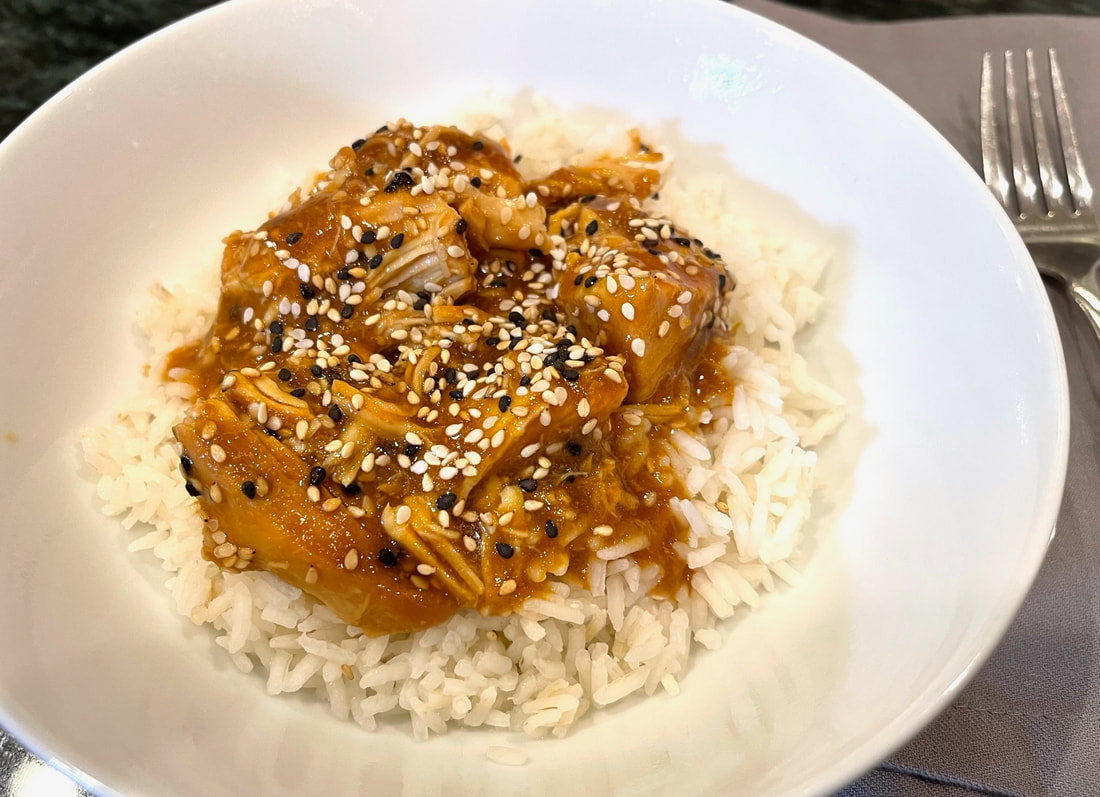 My kids love eating out, and sesame chicken is always a favorite. But it gets expensive, and this is an easy alternative that makes enough for everyone. Even if you have a teenager in the house. I gave this recipe from Allrecipes a try in the Delaney Test Kitchen a while ago, and it was an instant favorite. I make it with 2 pounds of chicken just to make sure there’s some left for me. I serve it with sticky rice and roasted broccoli. It’s yummy every time. Enjoy!
Sesame Chicken in the Slow Cooker INGREDIENTS: · 1 ½ pounds skinless, boneless chicken breast · ½ cup honey · ¼ cup soy sauce · 2 tablespoons ketchup · 2 tablespoons dried minced onion · 1 tablespoon vegetable oil · ½ teaspoon garlic powder · 2 teaspoons cornstarch · 3 tablespoons water · sesame seeds PREPARATION: · Step 1 Spray the inside of the slow cooker with cooking spray. Spread chicken into the crock of a slow cooker. · Step 2 Stir honey, soy sauce, ketchup, minced onion, vegetable oil, and garlic powder together in a bowl; pour over the chicken. · Step 3 Cook on Low until the chicken is tender, about 3 to 4 hours. · Step 4 Remove chicken from the sauce in the slow cooker to a cutting board. Stir water and cornstarch together to dissolve cornstarch completely; then pour into the sauce in the slow cooker until smooth. · Step 5 Cook on High until slightly thickened, about 10 minutes. · Step 6 Cut chicken into bite-size pieces and stir into the sauce. Sprinkle sesame seeds over the chicken and sauce mixture. Cooking Note: You can also cook the chicken in sauce on High for 1 1/2 to 2 1/2 hours, if you want it finished sooner. I thought this recipe sounded like a good, quick solution for a busy weeknight. But after making it and seeing how quickly it was devoured, I also think this is a great solution for lunch or nibbles when you have a house full of guests at the holidays.
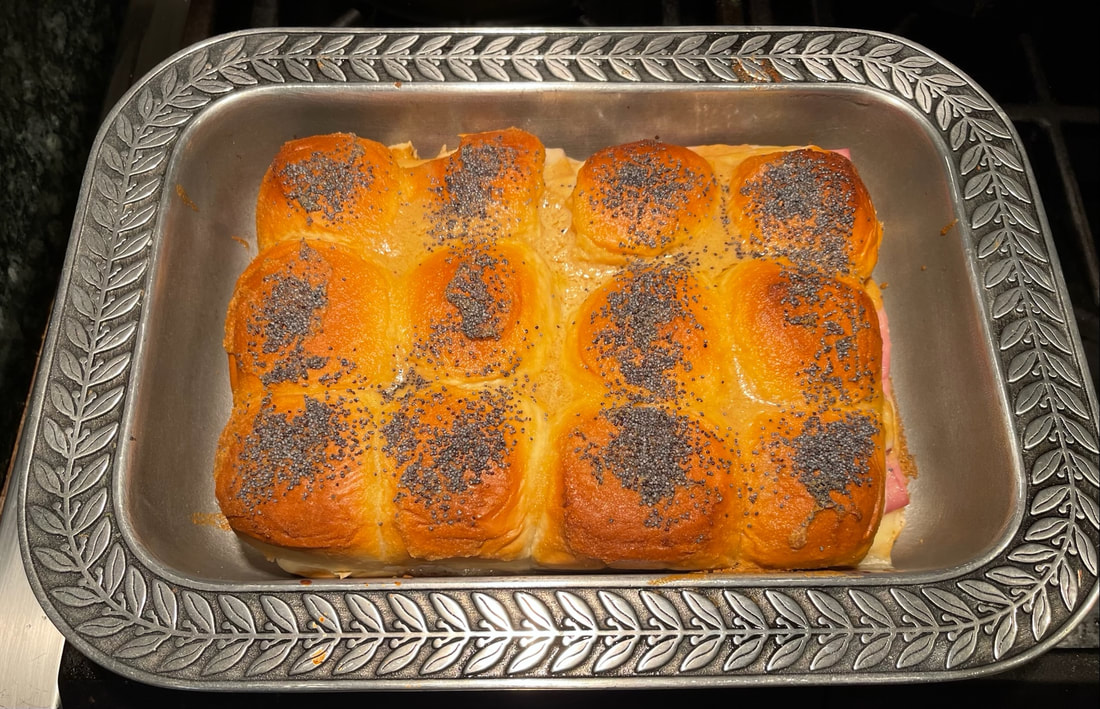
This was a huge hit in the Delaney Test Kitchen, and while the recipe says that leftovers will keep in the fridge for three days, I’ll just be honest and tell you there won’t be any leftovers. Enjoy! Ham and Cheese Sliders INGREDIENTS: · 4 tablespoons (1/2 stick) unsalted butter · 1 tablespoon Dijon mustard · 1 teaspoon Worcestershire sauce · 1/2 teaspoon onion powder · 1/4 teaspoon kosher salt · 1 (12-ounce) package Hawaiian sweet rolls, such as King's · 12 slices Swiss cheese (about 7 ounces), divided · 12 thin slices deli ham (about 10 ounces) · 1 teaspoon poppy seeds PREPARATION: 1. Arrange a rack in the middle of the oven and heat the oven to 350°F. 2. Place 4 tablespoons unsalted butter in a small, microwave-safe bowl and microwave until melted, 20 to 30 seconds. (Alternatively, melt butter in a small saucepan over medium heat.) Add 1 tablespoon Dijon mustard, 1 teaspoon Worcestershire sauce, 1/2 teaspoon onion powder, and 1/4 teaspoon kosher salt, and whisk to combine. 3. Without separating the rolls, cut 1 package Hawaiian sweet dinner rolls in half horizontally with a serrated knife. Place the bottom half of the rolls in a 9x13-inch or 7x11-inch baking dish. 4. Arrange 6 slices of the Swiss cheese on the rolls, overlapping the slices as needed to completely cover. Fold and arrange 12 thin slices ham over the cheese, arranging a slice on each roll. Layer the remaining 6 slices Swiss cheese over the ham. Place the top half of the rolls over the cheese. 5. Brush the butter onto the top of the rolls, then sprinkle with 1 teaspoon poppy seeds. Cover the baking dish tightly with aluminum foil. 6. Bake until the sandwich is heated through and the cheese melts, about 20 minutes. Uncover and bake until the rolls are lightly browned, 7 to 8 minutes. Transfer the slab to a cutting board, then cut into individual sliders with a serrated knife before serving. NOTES: Make ahead: The sandwiches can be assembled and the butter mixture prepared up to 1 day in advance and refrigerated separately. Melt the butter again before using, 30 to 35 seconds in the microwave. Storage: Refrigerate leftovers in an airtight container for up to 3 days. 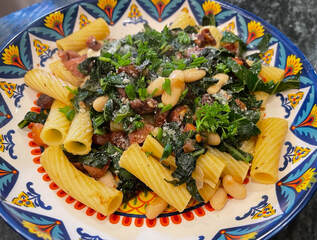 As a busy working mom, I am always on the lookout for yummy one-pot dinners. This one is actually two posts - one for boiling the pasta and one for everything else - but it was still easy. And this one was a bonus for the Delaney Test Kitchen since it has pasta in it – which is beige, and thus very popular in my house. This was a HUGE hit! And I even caught the boys actually eating the greens instead of picking them out. That is a solid win in my book. I’ve been asked to add this into our regular dinner rotation. And if you are worried about it being too spicy, it wasn't. It had just a light little kick that amped up the flavor. Pasta With Andouille Sausage, Beans and Greens INGREDIENTS: · Salt and black pepper · 1 pound rigatoni or any pasta with ridges · 2 tablespoons extra-virgin olive oil, plus more for drizzling · 12 ounces Andouille sausage, diced · 1 shallot, minced · 2 garlic cloves, minced · 1 bunch collard greens, stems discarded, leaves coarsely chopped (4 1/2 cups) · 1 tablespoon fresh thyme leaves · 1 (15-ounce) can cannellini beans, drained and rinsed · 1 cup diced fresh tomato (from 1 large) · ¼ cup chopped flat-leaf parsley · ¼ cup thinly sliced chives · 1 lemon, zested and cut into wedges, for serving · ¼ cup grated Parmesan, for serving PREPARATION: 1. Bring a large pot of salted water to a boil. Add pasta and cook until al dente according to the package’s instructions. 2. Meanwhile, heat oil in a large heavy-bottomed skillet over medium-high. Add sausage and cook, stirring occasionally, until browned, 5 to 7 minutes. Add shallot and garlic and cook, stirring often, until translucent, about 2 minutes. 3. Add collard greens and toss to wilt, 2 to 3 minutes. Season with salt and pepper. Add the thyme, cannellini beans and tomatoes and toss to warm through. Season again with salt and pepper to taste. 4. Reserve 1/2 cup pasta water and drain pasta. Return pasta to the empty pot and set over medium-low. Add the sausage mixture and toss to combine, gradually adding the reserved pasta water as needed to create a sauce. 5. Remove from the heat and sprinkle with parsley, chives, lemon zest and Parmesan. Season with salt and pepper to taste. Divide among bowls, drizzle with olive oil and serve with lemon wedges. 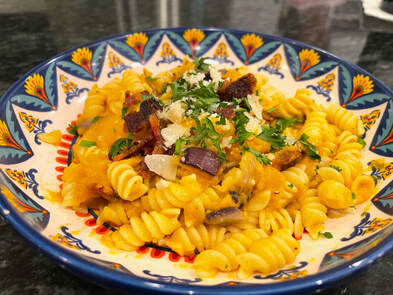 I am not a PSL fangirl, but I do love Fall cooking, especially with all the yummy autumn squashes. And the thought of combining squash flavors with pasta so that my boys might actually eat it was a challenge I was willing to take. This recipe did not take long, was not difficult, and was a huge hit. I added some extra red pepper flakes to give it a kick so that the guys would like it and it worked - my older son loved it! I’ve been asked to add it to our regular rotation of dinners. In our house, that is high praise. So this one was a definite win for the Delaney Test Kitchen. Enjoy!
Butternut Squash Pasta with Bacon and Parmesan INGREDIENTS:
PREPARATION:
|
AuthorKris Delaney is a marketing executive, foodie, travel enthusiast, and book nerd based in Atlanta, GA. Archives
July 2023
Categories
All
|

 RSS Feed